Configuration
The first time you start PeopleTracker, a people-config.ini is created in the directory you have specified. Please note that anytime you change the contents of people-config.ini, you will need to restart the Docker container .
# List of TZ names on https://en.wikipedia.org/wiki/List_of_tz_database_time_zones
timezone = UTC

[cameras]

  # Image file name, you can use any format codes
  # from https://docs.python.org/3/library/datetime.html#strftime-and-strptime-format-codes
  image_format = $(camera)_screenshots/%y-%m-%d/%H-%M-%S.%f.jpg

  [[camera-1]]
    active = yes
    url = rtsp://your-camera.com:8554/demo
    webhook-target = webhook-1
    sample = 5

    # Save to CSV file. The corresponding frame is stored as an image in the same directory.
    # See more formats on https://guides.platerecognizer.com/docs/other-apps/people-tracker/configuration#output-formats
    csv_file = $(camera)_%y-%m-%d.csv

[webhooks]

  [[webhook-1]]
    url = http://my-webhook-1.site
    image = yes
Hierarchical Configuration
people-config.ini file defines parameters that will be used by all cameras or just one.
When parameters are defined at the [cameras] level, they apply to all cameras. When they are defined at the [[camera-id]] level, they apply to a single camera.
[cameras]
  # Parameters for all cameras
  sample = 5
  image_format = $(camera)_screenshots/%y-%m-%d/%H-%M-%S.%f.jpg
  csv_file = $(camera)_%y-%m-%d.csv

  [[camera-1]]
    # Parameters set only for camera-1
    active = yes
    url = rtsp://192.168.0.108:8080/video/camera-1
    sample = 3 # sample = 3 is only applied for camera-1

  [[camera-2]]
    # Parameters set only for camera-2
    active = yes
    url = rtsp://192.168.0.108:8080/video/camera-2
    # sample = 5 defined in [cameras]
Some parameters are disabled by default, they are marked with the character # at the beginning of the line.
To activate the parameter, it is necessary to remove this mark, save the file and restart the Docker container.
Parameters
active
PeopleTracker processes all the cameras defined in the config file if active is set to yes. See example above.
sample
- Set PeopleTracker to skip frames of a particular camera or video file.
- By default,
sample = 2, so PeopleTracker processes every other frame. - Set
sample = 3if you want to process every third frame. - This parameter lets you skip frames in situations where you have limited hardware and/or do not need to process all the frames of the video or camera feed.
timezone
- You can set the timezone for the timestamp in the CSV and also Webhooks output.
- If you omit this field, then the default timezone output will be UTC.
- See list of supported time zones.
- Plate Recognizer automatically adjusts for time changes (e.g. daylight savings, standard time) for each timezone. Examples:
a) For Silicon Valley, use
timezone = America/Los_Angelesb) For Budapest, usetimezone = Europe/Budapest. You can also usetimezone = Europe/Berlin.
The timestamp field is the time the person was captured by the camera. We are using the operating system clock and we apply the timezone from people-config.ini.
url
- To run PeopleTracker on a RTSP camera feed, just specify the URL to point to the RTSP file.
For example:
or
url = rtsp://192.168.0.108:8080/video/h264url = rtsp://admin:12345@192.168.0.108:8080/video/h264
# where admin is the username and 12345 is the password - For additional help with RTSP, please go to https://www.getscw.com/decoding/rtsp
- You can also process video files.
Output Formats
csv_file
- Indicate the filename of the CSV output you’d like to save.
- The name can be dynamic. Refer to the field image_format for details. For example:
csv_file = $(camera)_%y-%m-%d.csv
jsonlines_file
- Save the prediction results to a JSON file. For example:
jsonlines_file = my_camera_results.jsonljsonlines_file = $(camera)_%y-%m-%d.jsonl
- We are using the JSON Lines format. Refer to the field image_format for details.
image_format
Save images in a particular folder with a specific filename. In the example above, images are saved in the directory <camera_id>_screenshots (one per camera) with the filename <timestamp>.jpg. Images are saved when csv_file or jsonlines_file is used. If webhooks are used, images may temporarily be saved to disk.
- Filename customization:
- If
$(camera)is used, it is replaced with the camera's name. For example,camera-1. - If the current date is 2020-06-03 20:54:35.
%y-%m-%d/%H-%M-%S.jpgis replaced by20-06-03/20-54-35.jpg. Letters starting with the percent sign are converted according to those rules https://strftime.org/ - For example, to put images from all cameras into the same folder:
image_format = screenshots/$(camera)_%y-%m-%d_%H-%M-%S.%f.jpg
- If
- If you don't need to save images, you can leave it empty:
image_format =.
If you have a webhook with images, image_format should NOT be empty.
Webhook Parameters
PeopleTracker can automatically send a notification to an URL, when a tracked object is confirmed as a person within the video stream. You can use Webhooks as well as save images and CSV files in a folder. By default, no Webhooks are sent.
How Webhook are Sent
- If the target cannot be reached (HTTP errors or timeout), the request is retried 3 times.
- If it is still failing, the data is saved to disk. That can be turned off using
cachingwebhook parameter.- When a webhook fails, all new webhook data will be directly saved to disk.
- Every 2 minutes, there is an attempt to send the cached webhooks. If a send is successful, we will also process the data saved to disk if there is any.
- When webhooks are saved to disk, we remove the oldest data when the free disk space is low.
Format and Fields
- Description of the webhook data format.
webhook_targets
- To send data to webhooks, you must list them in
webhook_targetscamera property of thepeople-config.ini. - The recognition data and image are encoded in multipart/form-data.
- To ensure that your
webhook_targetsendpoint is correct, please test it out at www.webhook.site.
You can send to multiple targets by simply listing all the targets. Each target has its own set of parameters: url, image, header.
webhook_targets = my-webhook-1, my-webhook-2
webhook descriptors
Each webhook you are planning to use should be described in [webhooks] section of the people-config.ini file. This section also uses Hierarchical Configuration structure:
# Webhook targets and their parameters
[webhooks]
  image = yes

  [[my-webhook-1]]
    url = http://my-webhook-1.site

  [[my-webhook-2]]
    url = http://my-webhook-2.site
    image = no
url (webhook)
Specifies the URL to send the webhook data to. For example:
url = http://my-webhook-1.site
image
- This field can be set to either:
image = yes
image = no - When
image = nois set, it will send only the recognition data but the image data will not be sent to the target URL. This lets your system receive the information faster.
caching
If a webhook fails, it is by default cached to disk and retried later.
To turn this off, use caching = no.
request_timeout
A webhook request will timeout after request_timeout seconds. The default value is 30 seconds.
header
The webhook request can have a custom header. To set it, use header = Name: example. By default no custom header is used.
Other Parameters
Detection Zone
Detection Zones exclude trees, street signs or other objects. For more info, read our blog on Detection Zones.
- To start, go to our Detection Zone in your Plate Rec Account Page and upload a capture from the camera set up on the PeopleTracker.
- Add the camera_id parameter, it is between
[[]]in your people-config.ini configuration file, make sure they are identical. The image below represents an example whose camera_id is 'camera_1". After these steps click "Add Zone".
  [cameras]
    # Global cameras parameters here
    [[camera_1]]
      active = yes
      url = rtsp://<rtsp_user>:<rtsp_password>@<rtsp_url>:<rtsp_port>/<rtsp_camera_path>
      # More camera parameters below
      # ...
-
The system will load the added image and a page similar to the image below will display it, then you can use the mouse as a marker over the image to determine the area that will be ignored in the detection. Once you are done, click "Save Zone".
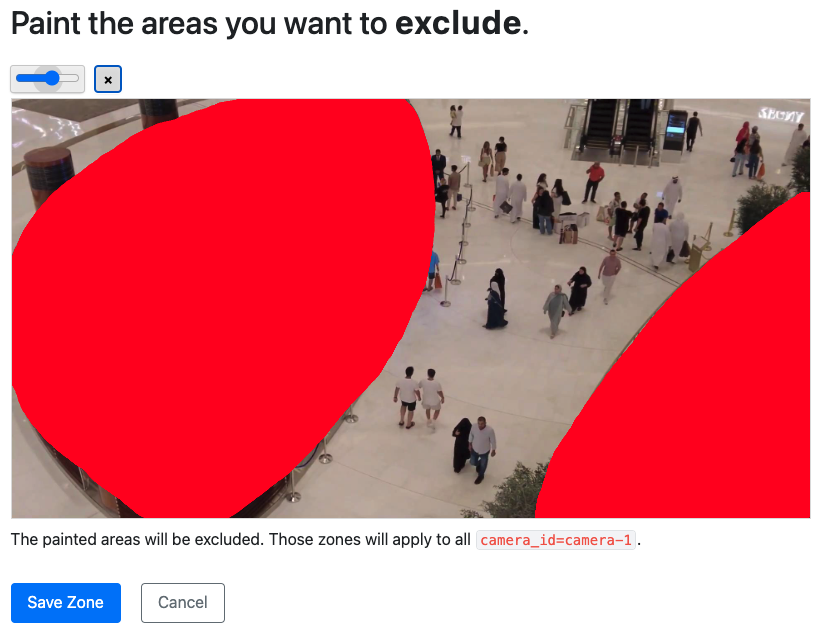
-
Make sure to restart the Docker container and that machine has internet access at the time of the restart to see the effects. When you open your PeopleTracker folder, you will now see one file per zone.
Editing Zone Files
To edit a detection zone, Click Edit on Detection Zone then follow step (3). After this, remove the file zone_camera-id.png from the PeopleTracker folder then follow step (4). When you open your PeopleTracker folder, you will now see the new file zone_camera-id.png.
Removing Zone Files
To remove a detection zone, click Remove on Detection Zone. Then remove the file zone_camera-id.png from the PeopleTracker folder.
Detection Zone Files
After following the steps above, you will have new files in your PeopleTracker folder. For example, if you create a detection zone for camera1, you will have an image at /path/to/PeopleTracker/zone_camera1.png.
You can also manually create a detection zone mask. Here are the requirements.
- Create a PNG image in your PeopleTracker folder. Check the file permissions; it should be readable by your Docker user.
- Name the file
zone_camera-id.png(replacecamera-idwith the ID of your camera). - Use only two colors: black for masked areas and white for everything else.
- The image resolution should match the resolution used by the camera.
