Gate Opener on Raspberry Pi
This How-To Guide lists the steps required to successfully run Plate Recognizer Gate Opener on a Raspberry Pi. Additional components are required and described in this document below. The server application is designed to be run on a Raspberry Pi for receiving ParkPow webhooks and opening gates.
Gate Opener on Raspberry Pi is licensed only for use with an active subscription to Plate Recognizer Stream, Plate Recognizer Snapshot SDK, or ParkPow. Any usage or integration of Gate Opener outside of these applications is a violation of Plate Recognizer and ParkPow's Terms and Conditions.
Architecture Overview
Gate Opener works in the following manner:
- This application takes license plate readings from Plate Recognizer Stream. Whenever a vehicle plate is detected, Stream sends the LPR readings via webhooks to the Gate Opener.
- The Gate Opener compares the license plate against a local whitelist database. If the LPR reading matches the whitelist, then the Gate Opener will trigger the gate to open by initiating the appropriate input pin.
- ParkPow maintains the whitelist of vehicles. The Gate Opener periodically pings ParkPow for the latest list of vehicles and updates the local whitelist database accordingly.
Set Up the Hardware
Gate Opener is designed to connect to gate motors or external devices, such as command inputs (Request to Exit - RTE), relays, or other systems that use control signals.
It operates by setting the RTE pin to HIGH or LOW, depending on the logic required by the connected device.
Each IO Pin is mapped to a reader input. For example:
| Pin | Input |
|---|---|
| GPIO 5 (Gate 1) | READER 1 INPUT(RTE) |
| GPIO 6 (Gate 2) | READER 2 INPUT(RTE) |
| GPIO 13 (Activity Pin) | May function as an "Activity" light Pin goes HIGH when the server is refreshing it's access lists. An LED may be connected with a series resistor. |
| Raspberry Pi GND | READER 1 GND, READER 2 GND … |
- If you plan to use a wire connection, please insert the Ethernet cable.
- It does not matter which GND pins you connect to the READER INPUTS. It only matters that the GND pins on both READER INPUTS are connected to the GND pins on the Raspberry Pi.
Adjusting the Initial State
By default, in the provided code, all pins are initialized in the HIGH state. If the connected device requires the initial state to be LOW, you can adjust the configuration directly in the code by modifying the configure_io_pins() function to set the desired state.
def configure_io_pins():
    for gate in CONFIG.gates:
        DEVICES.off(gate.io_pin)  # Initializes as LOW (adjust to .on() if HIGH is required)
If necessary, you can also modify the signal sequence and duration. The open_close_gate() function is executed when a positive detection occurs. By default, the pin is set to OFF, and after a predefined period, it is set back to ON.
def open_close_gate(pin_num: int):
    DEVICES.off(pin_num)  # Set the pin to LOW to trigger the action
    time.sleep(CONFIG.gate_open_period)  # Wait for the configured open period
    DEVICES.on(pin_num)  # Return the pin to HIGH to reset the state
This flexibility allows you to adapt the gate opener logic to meet the specific requirements of your connected device.
Install Gate Opener
Connect to the Raspberry Pi
-
You will first have to find the IP address on the Pi. If your device is connected to the same network then you can use multicastDNS to automatically find the IP address.
-
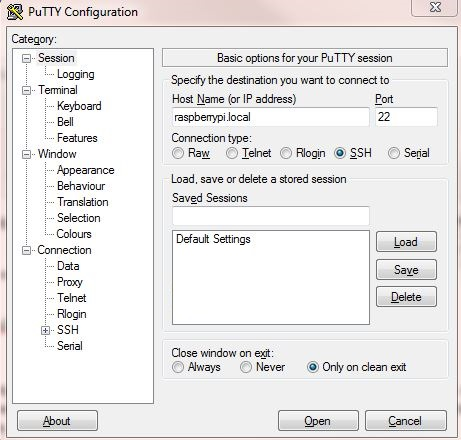
To connect to the Raspberry Pi, we recommend you use PuTTY.
-
On your computer, open PuTTY and enter the Host Name as raspberrypi.local and press open.
-
If everything goes according to plan, you’ll be prompted with a security prompt. Press “Yes”
-
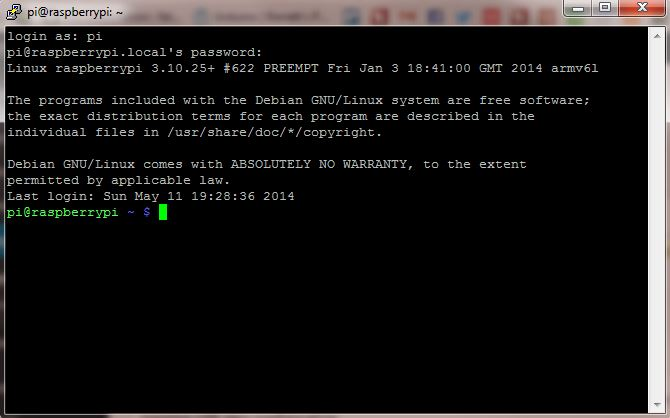
This will open a terminal and ask for a Username and Password. The username is “pi” and the password is “raspberry“. After entering the credentials, you’ll get logged on to the Raspberry Pi terminal.
-
Install Gate Opener on Raspberry Pi
All the following commands needs to be run on the PI
-
Install Docker and Docker-Compose on the PI using official instructions available here
-
Download the Gate Opener App and unzip it. The application content should be as shown below:
wget https://app.parkpow.com/static/gateserver.zip
unzip gateserver.zip
cd gateserver
Expected Structure:
├── configDir
│   └── config.sample.json
├── conftest.py
├── docker-compose.yml
├── Dockerfile
├── parkpow_gate_opener.py
├── parkpow_gate_opener_test.py
├── README.md
├── requirements.txt
└── test-fixtures
    ├── accessList.csv
└── vehicles-api.json -
Create a configuration file by copying
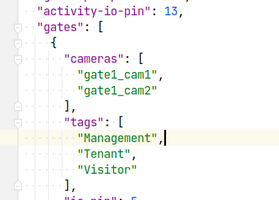
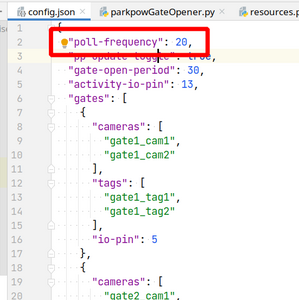
configDir/config.sample.jsontoconfigDir/config.json. Here's an example with 2 gates and each has its own list of vehicle tags and camera names that are configured with the ParkPow application: For more information see Configuration File section.
    {
    "poll-frequency": 20,
    "pp-update-toggle": true,
    "gate-open-period": 2,
    "activity-io-pin": 13,
    "gates": [
    {
        "cameras": [
        "gate1_cam1",
        "gate1_cam2"
        ],
        "tags": [
        "gate1_tag1",
        "gate1_tag2"
        ],
        "io-pin": 5
    },
    {
        "cameras": [
        "gate2_cam1",
        "gate2_cam2"
        ],
        "tags": [
        "gate2_tag1",
        "gate2_tag2"
        ],
        "io-pin": 6
    }
    ],
    "pp-api-token": "<token>"
    }
-
Start Gate Opener with the following commands inside the
gateserverfolder:sudo docker-compose up --build
# To run in the background, include -d option
Configure Gate Opener
The configuration file is located at configDir/config.json relative to the location of the docker-compose.yml file.
Each item in the configuration file is described below:
i. pp-api-token
The <token> should be replaced with the correct token which is used to fetch details from ParkPow REST APIs. Go here to locate the ParkPow API Token.
ii. tags
In the Gate Opener configuration file, make sure to appropriately indicate the “tags”. In the example below, all vehicles that are tagged as “Management, Tenant and Visitor” in ParkPow will trigger the gate to open.
- Inside ParkPow Settings > Manage Vehicles, you can upload a spreadsheet with the license plate, Vehicle Tag and other information you want to include.
- You can also add a new vehicle with specific Vehicle Tag one at a time.
- When you click on a specific vehicle in the Main Dashboard and go into the Vehicle Details Page, you can also edit an existing vehicle’s Vehicle Tag.
iii. gates
Each gates have its own set of camera names and IO-pin numbers to control them.
iv. pp-update-toggle
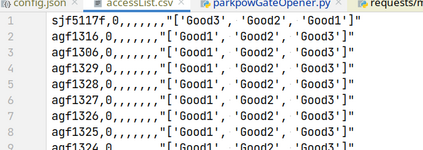
Whether to update vehicle access-list from the Parkpow API server. You can also manually edit the whitelist. To do so, just change the contents in the accessList.csv. In that case, disable ParkPow sync with "pp-update-toggle": false.
v. poll-frequency
The frequency (in seconds), in which the access-list is updated from Parkpow API server. The Gate Opener application pulls data from ParkPow based on the poll-frequency variable. In the example below, it is every 20 seconds.
To sync ParkPow with accessList.csv, sign up for a free trial of ParkPow and get the ParkPow API Token.
Whenever Gate Opener pings ParkPow, it rewrites the accessList.csv. So this means that the new data pull will replace all of the existing plates in the Gate Opener database. In other words, the access.List.csv file is refreshed every 20 seconds.
vi. gate-open-period
Number of seconds to wait before closing the gate again.
vii. activity-io-pin
Optional activity monitoring (LED) pin number. In case of updating access-list from API server, the activity is shown using this pin.
Customize Gate IO
If the IO to control the gate requires customization, you can edit the function open_close_gate in parkpow_gate_opener.py. For example, you could do the following:
def open_close_gate(pin_num):
   # use the API directly
    gate = gpiozero.LED(17)
    gate.on()
    time.sleep(CONFIG.gate_open_period)
    gate.off()
Send Vehicle Information
Configure Stream
- Install Stream. Please refer to the Stream Installation Guide.
- Configure it to send webhooks to Gate Opener. In Stream Configuration, go to Webhooks and add a new webhook with the following details:
[[my-camera]]
    webhook_targets = gate-opener

[webhooks]
  [[gate-opener]]
    url = http://192.168.86.25:8010/postJson
    image = no
- In this example, the vehicle details are sent to the Raspberry Pi with IP 192.168.86.25 and port 8010.
- Images are not used by the Gate Server. We recommend setting
image = no.
REST API
If you do not plan to use Stream, you can use the Gate Opener REST API to send visit data.
HTTP Request
POST /postJson
POST Parameters
json
It should have data in the webhook format. Gate Opener is using these specific fields:
hook.iddata.results[].platedata.results[].orientation
