Installing Snapshot SDK on AWS
This comprehensive guide provides step-by-step instructions for deploying the Snapshot SDK across Amazon Web Services (AWS) compute environments. Choose the deployment method that best fits your infrastructure requirements and technical expertise.
Overview
The Snapshot SDK can be deployed on three primary AWS compute services, each offering different advantages:
| Service | Best For | Key Benefits |
|---|---|---|
| EC2 | Traditional VM deployments | Full control, custom configurations, cost-effective |
| ECS | Container-based applications | Managed container orchestration, scalability |
| EKS | Kubernetes workloads | Advanced orchestration, multi-cloud portability |
Deployment Options
📦 Elastic Compute Cloud (EC2)
Deploy on virtual machine instances with complete infrastructure control. Ideal for traditional deployments and custom configurations.
🐳 Elastic Container Service (ECS)
Run containerized applications with AWS-managed orchestration. Choose between two launch types:
- EC2 Launch Type - Run containers on your own EC2 instances for maximum control and cost optimization
- Fargate Launch Type - Serverless container deployment with automatic infrastructure management
☸️ Elastic Kubernetes Service (EKS)
Deploy on managed Kubernetes clusters for advanced orchestration capabilities and cloud-native architectures.
Need to receive webhook results in an AWS Lambda function?
You can use our open-source example.
Elastic Compute Cloud (EC2)
Amazon Elastic Compute Cloud provides secure, resizable compute in the cloud, offering the broadest choice of processor, storage, networking, OS, and purchase model.
Setup instructions using new console experience:
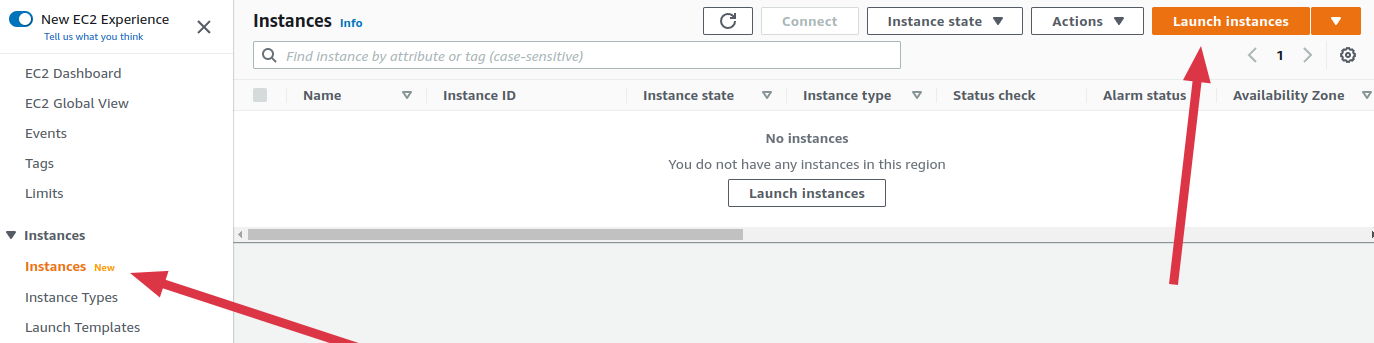
- Visit EC2 console and Launch an Ubuntu linux instance:
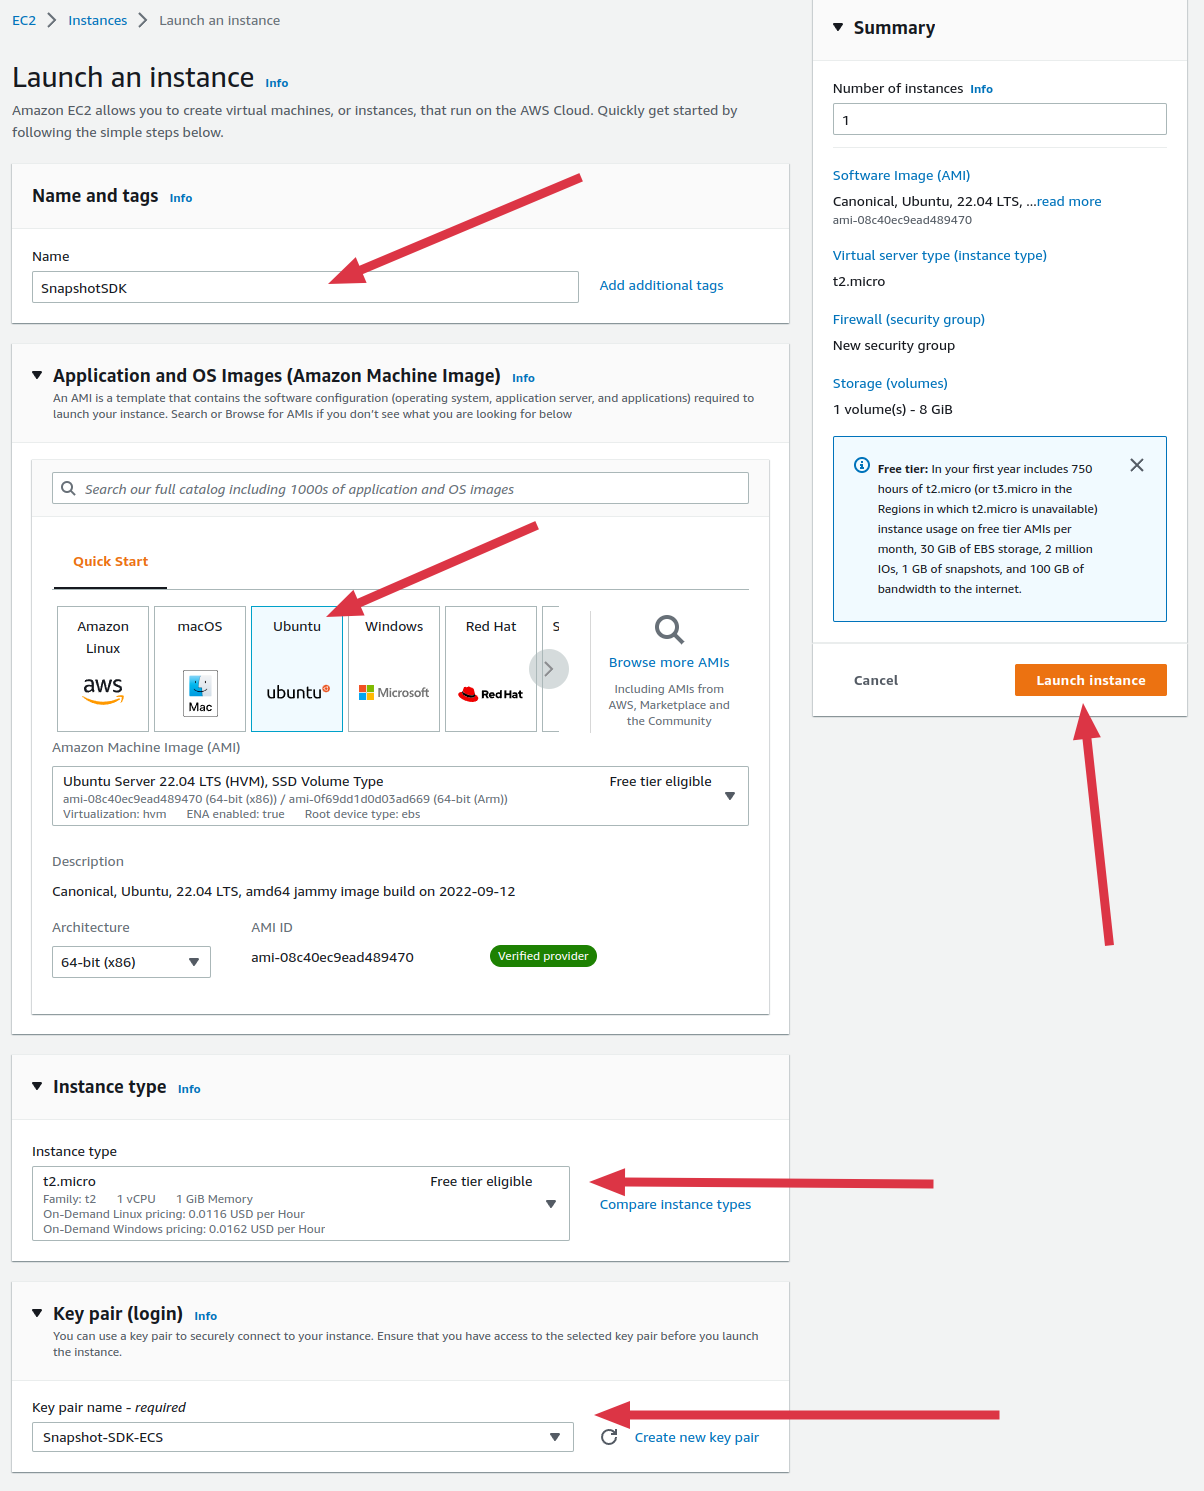
- Enter a desired name, Select Ubuntu Amazon machine Image (AMI), Select an SSH Key pair then click Launch instance, You can leave the other options as the default:
-
Once the instance is running and has finished initializing, connect via SSH to begin the installation, The ssh command looks like below:
ssh -i "Snapshot-SDK-ECS.pem" [email protected]tipIf you get an error
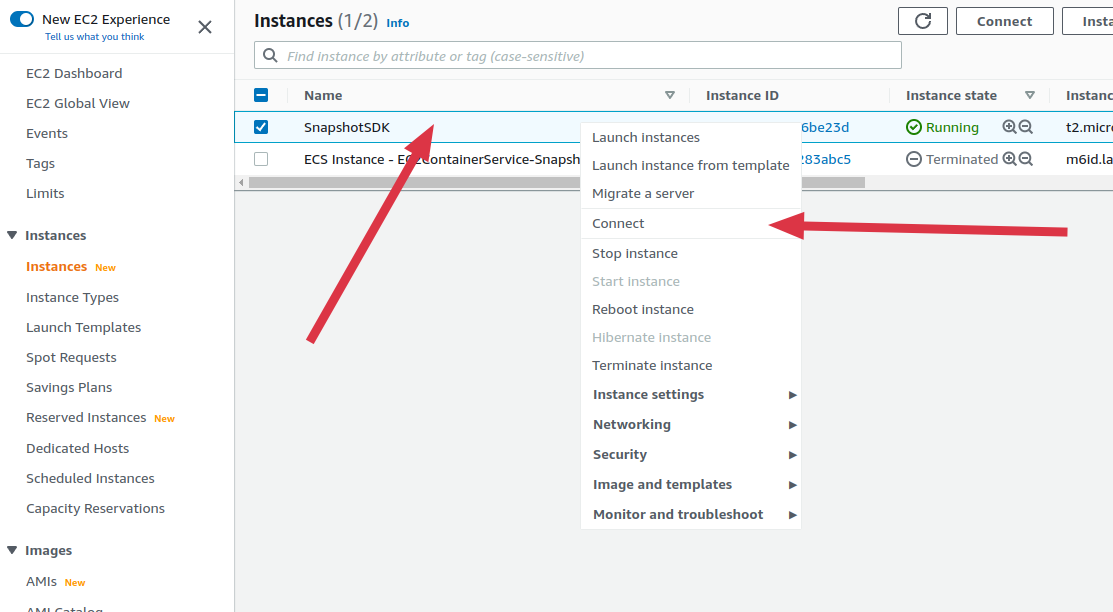
Load key "Snapshot-SDK-ECS.pem": bad permissions, Fix by updating key file permissions:chmod 400 Snapshot-SDK-ECS.pemtipFor other ways of starting an SSH session, right click on the instance then click on Connect.
-
After a successful connection, proceeded with Snapshot SDK installation steps Ensure the Inbound Rules of the Security Group attached to the EC2 instance allow incoming connection on the PORT mapped to 8080 of the SDK container. The SDK API should now be accessible via the EC2 instance public IP that is visible in the instance details.
Elastic Container Service (ECS)
Amazon ECS is a fully managed container orchestration service that makes it easy for you to deploy, manage, and scale containerized applications. ECS provides two main ways you can run the Snapshot SDK service:
- EC2 launch type
- Fargate launch type
In case of a failed service startup or taking too long:
- Check the service events by clicking on the service.
- Check the container logs on AWS CloudWatch.
- SSH into the EC2 instance and check container logs using docker commands.
To make edits to the container, create a revision of the task definition then update the service to use the new revision. Select Force new deployment so that the services are restarted with the new configurations.
EC2 launch type
Run your containerized applications on Amazon EC2 instances that you register to your Amazon ECS cluster and manage yourself.
Setup instructions using new console experience:
User account creating the cluster should have these permissions besides EC2 and ECS if not an administrator:
- iam:CreateRole
- iam:AttachRolePolicy
- logs:CreateLogGroup
- logs:CreateLogStream
- iam:ListInstanceProfilesForRole
- iam:AddRoleToInstanceProfile
- iam:CreateInstanceProfile
- iam:AttachRolePolicy
- iam:CreateRole
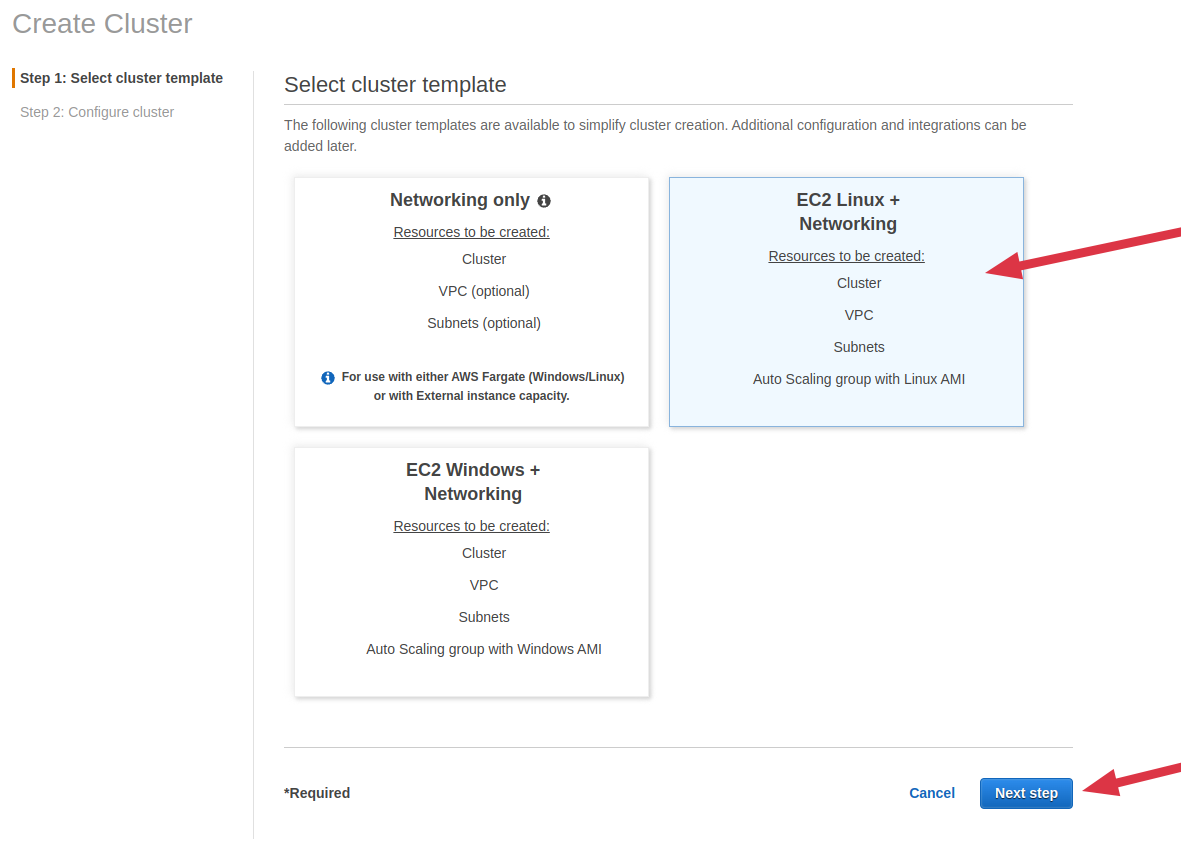
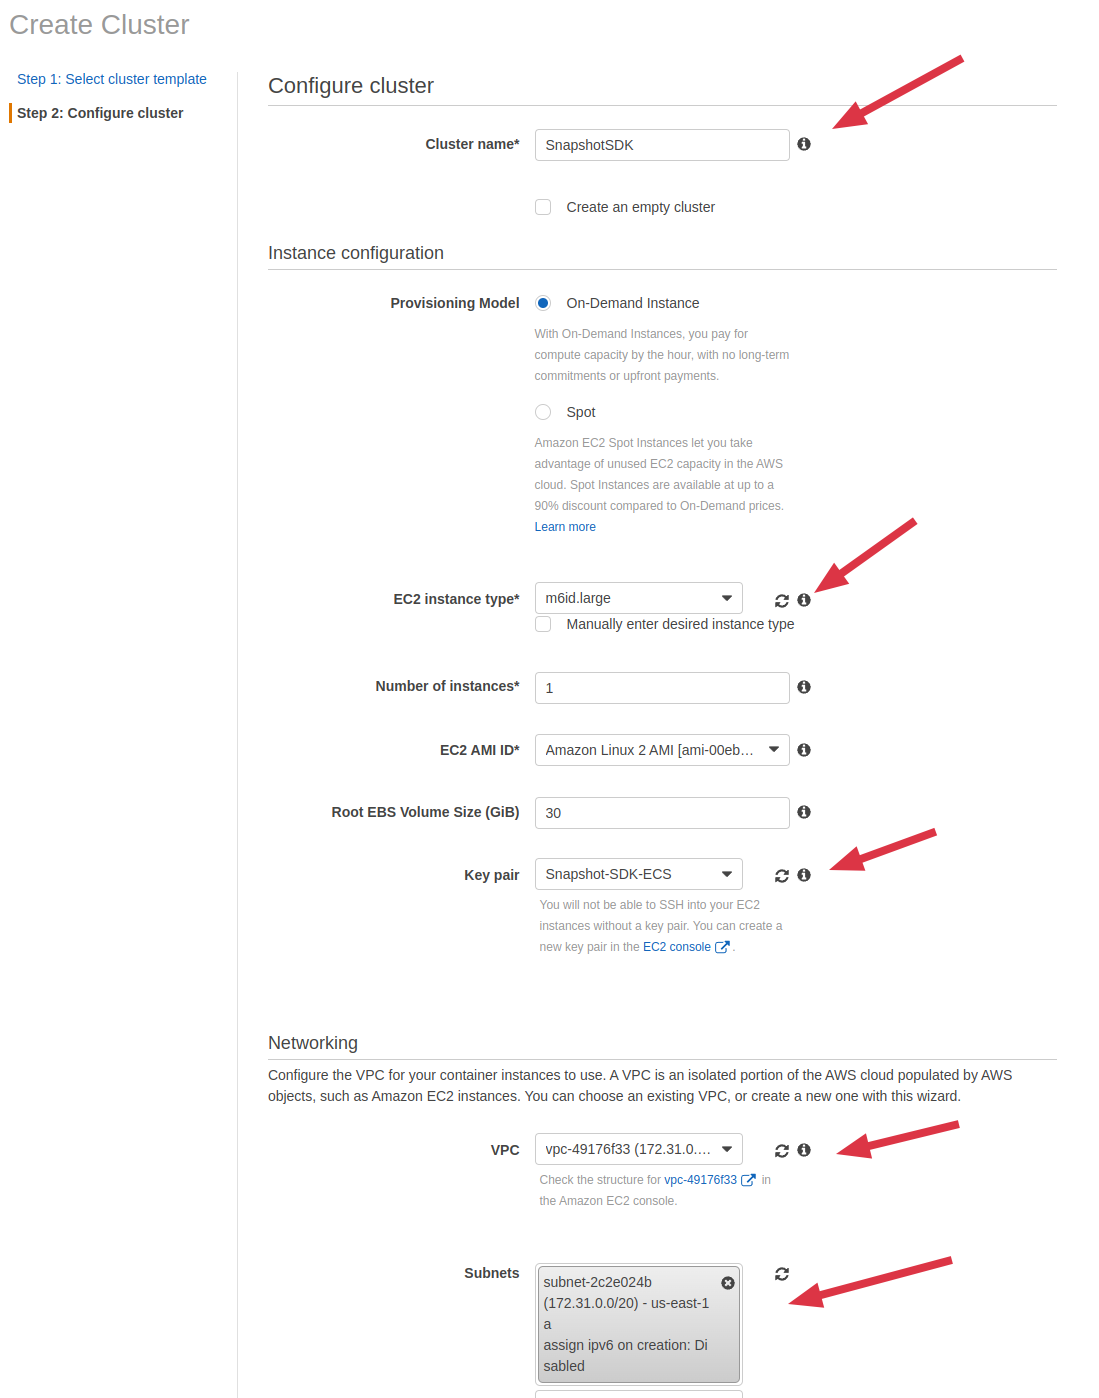
- Create an ECS cluster, Ensure to select EC2 Linux+Networking template
- Enter a cluster name and select a desired EC2 instance size
- Select a Key pair to be able to SSH to the instance later
- Select to create a new VPC or choose an existing VPC and Subnet, then click on Create at the bottom.
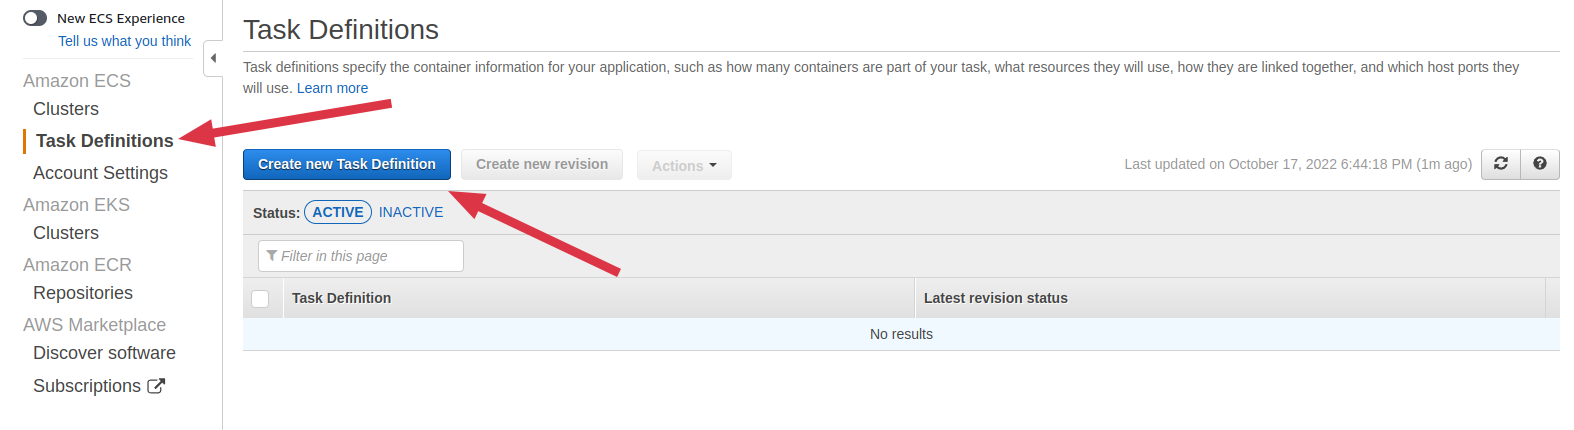
- After the cluster is created, click on View Cluster, click on Task Definitions on the left sidebar, click on Create new Task Definition
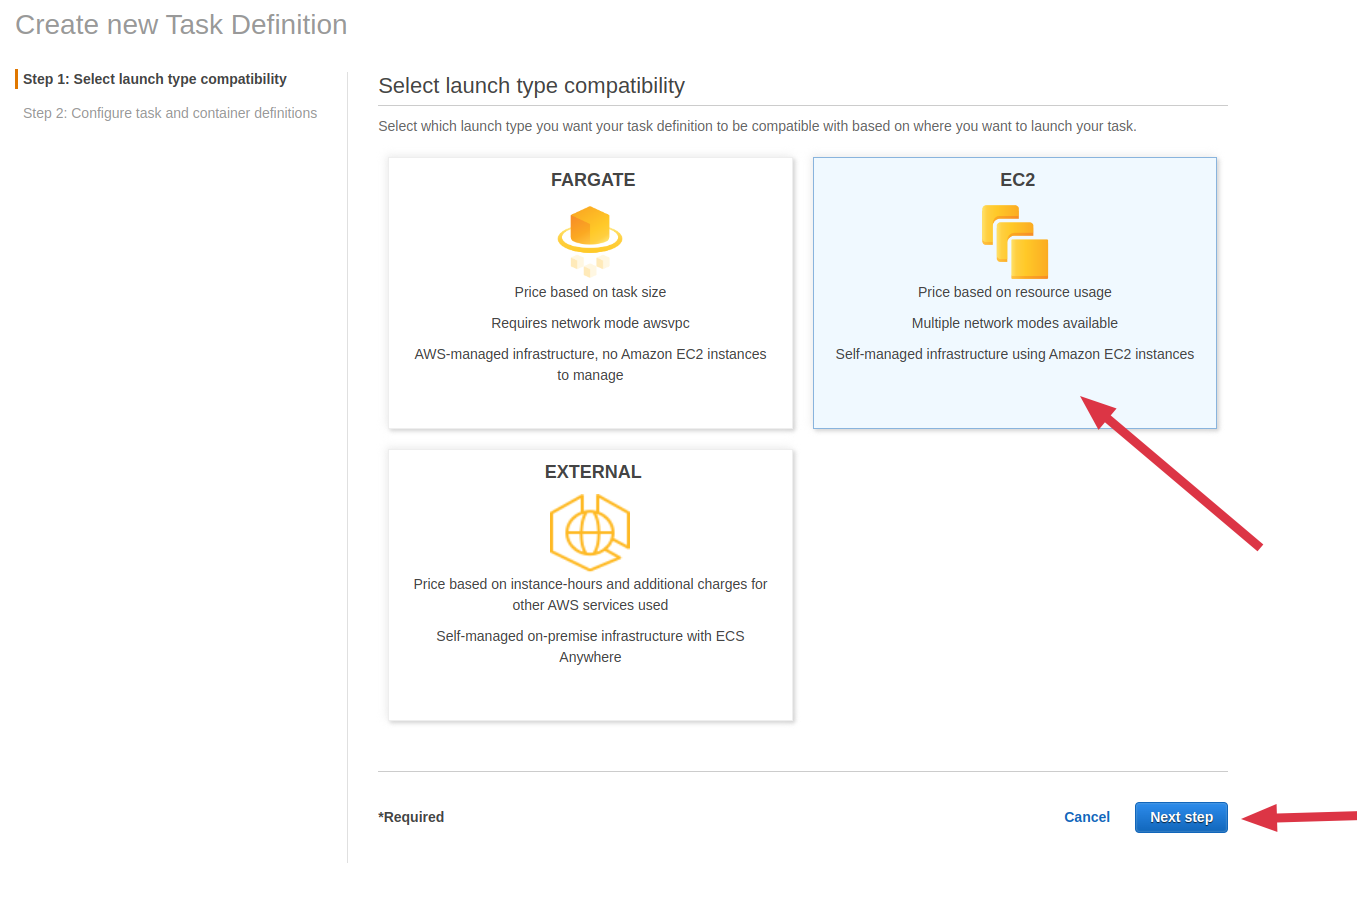
- Select EC2 launch type compatibility then click on Next step
-
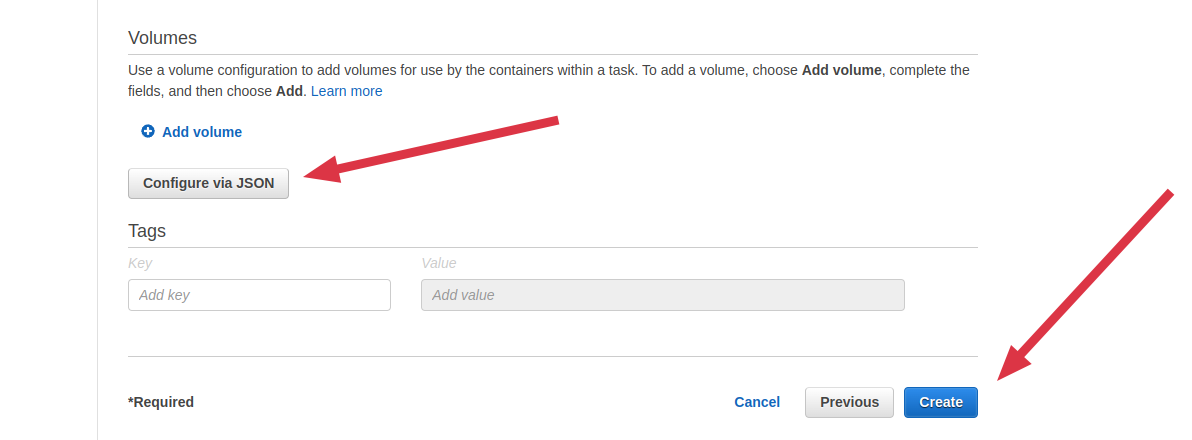
Scroll to the bottom and click on Configure via JSON then paste the JSON below into the input.
 danger
Edit these properties in the JSON before saving:
containerDefinitions.environment.0.valuewith your TOKENcontainerDefinitions.environment.1.valuewith your LICENSE_KEY
{
  "family": "platerecognizer-alpr",
  "containerDefinitions": [
    {
      "name": "snapshot",
      "volumesFrom": [],
      "memory": 600,
      "memoryReservation": 100,
      "portMappings": [
        {
          "hostPort": 80,
          "protocol": "tcp",
          "containerPort": 8080
        }
      ],
      "essential": true,
      "entryPoint": [],
      "mountPoints": [
        {
          "containerPath": "/license",
          "sourceVolume": "snapshot-license-volume"
        }
      ],
      "environment": [
        {
          "name": "TOKEN",
          "value": "XXX"
        },
        {
          "name": "LICENSE_KEY",
          "value": "YYY"
        }
      ],
      "links": [],
      "image": "platerecognizer/alpr",
      "command": [],
      "logConfiguration": {
        "logDriver": "awslogs",
        "options": {
          "awslogs-group": "/ecs/snapshot-sdk",
          "awslogs-region": "us-east-1",
          "awslogs-stream-prefix": "snapshot",
          "awslogs-create-group": "true"
        }
      }
    }
  ],
  "requiresCompatibilities": ["EC2"],
  "compatibilities": ["EXTERNAL", "EC2"],
  "volumes": [
    {
      "host": {
        "sourcePath": "/root/snapshot-license"
      },
      "name": "snapshot-license-volume"
    }
  ]
}
Click save, then click create
-
Go back to viewing the cluster, select the Services tab, then click on Create
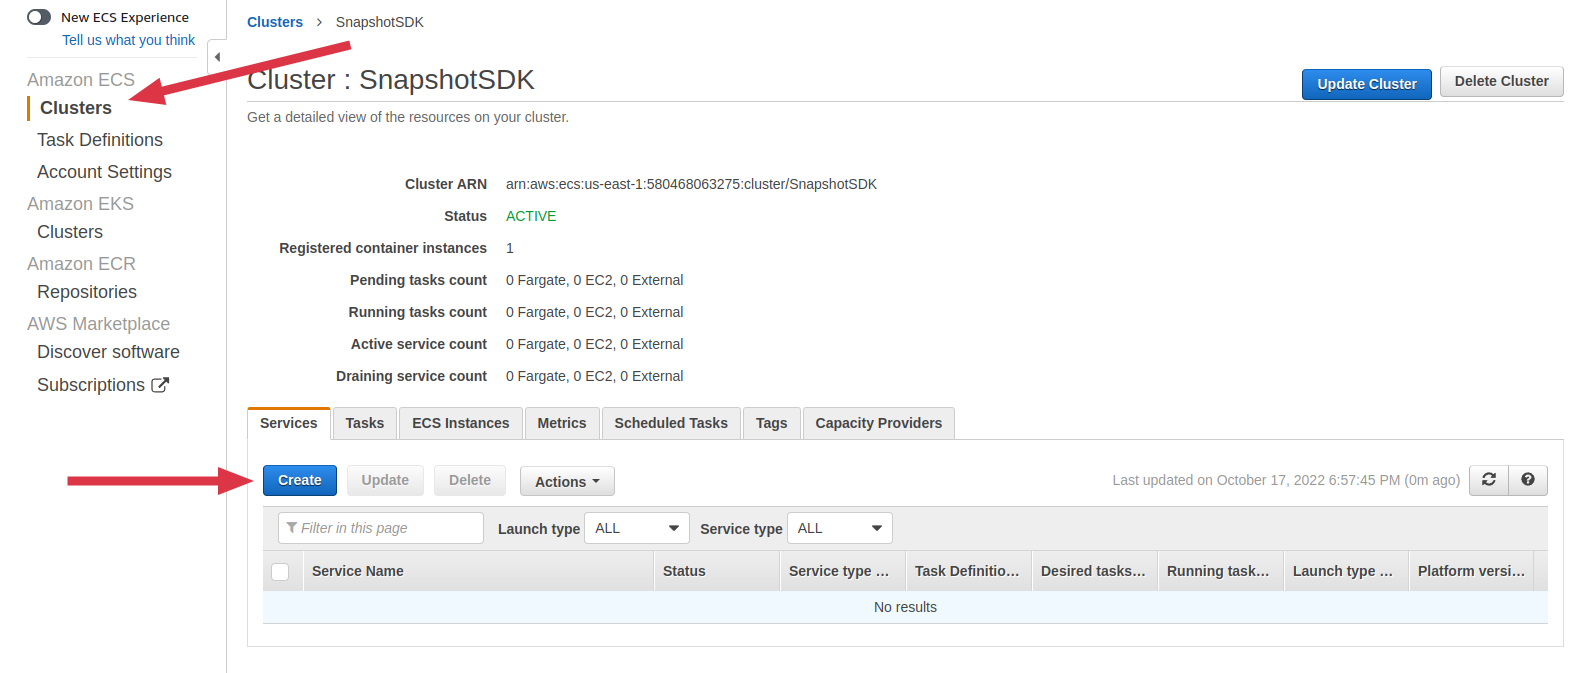
-
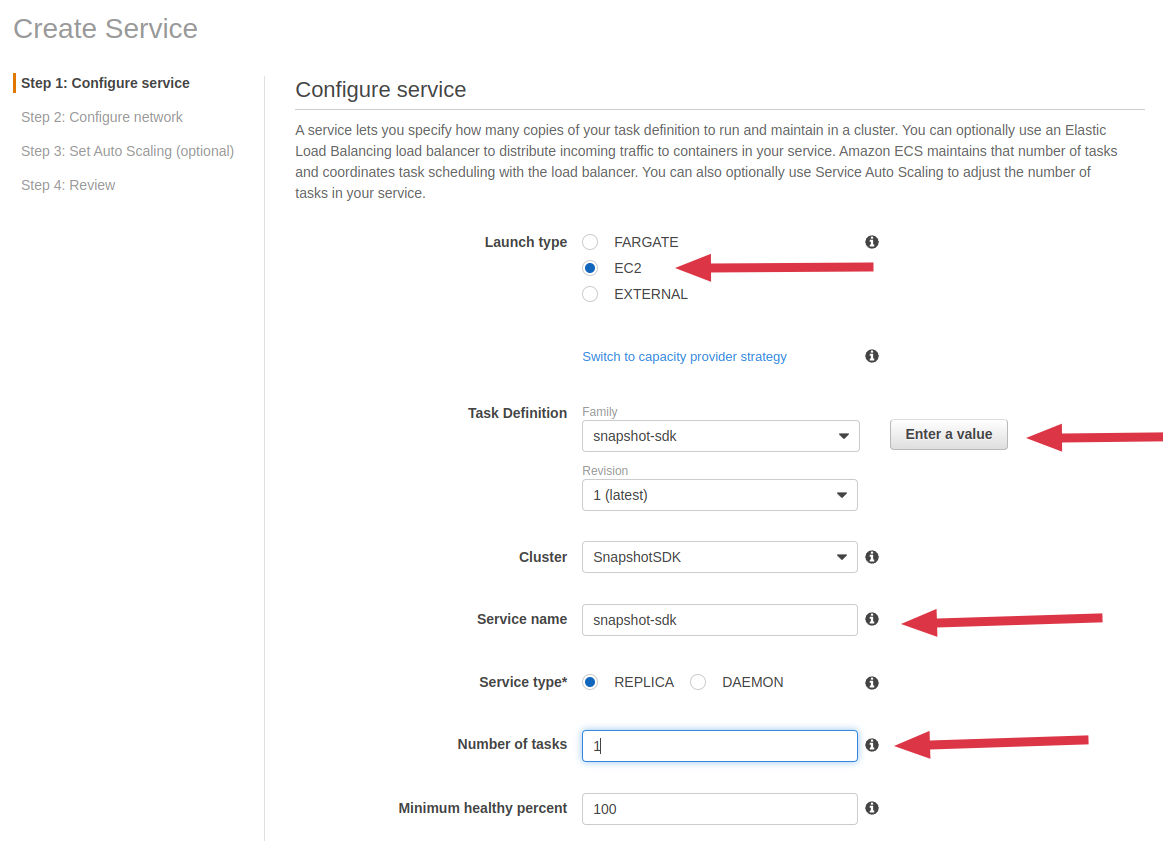
Configure the service
- Select EC2 Launch type
- Select the Task Definition you previously created
- Enter a preferred Service name
- Enter 1 as the desired number of tasks then click on Next Step
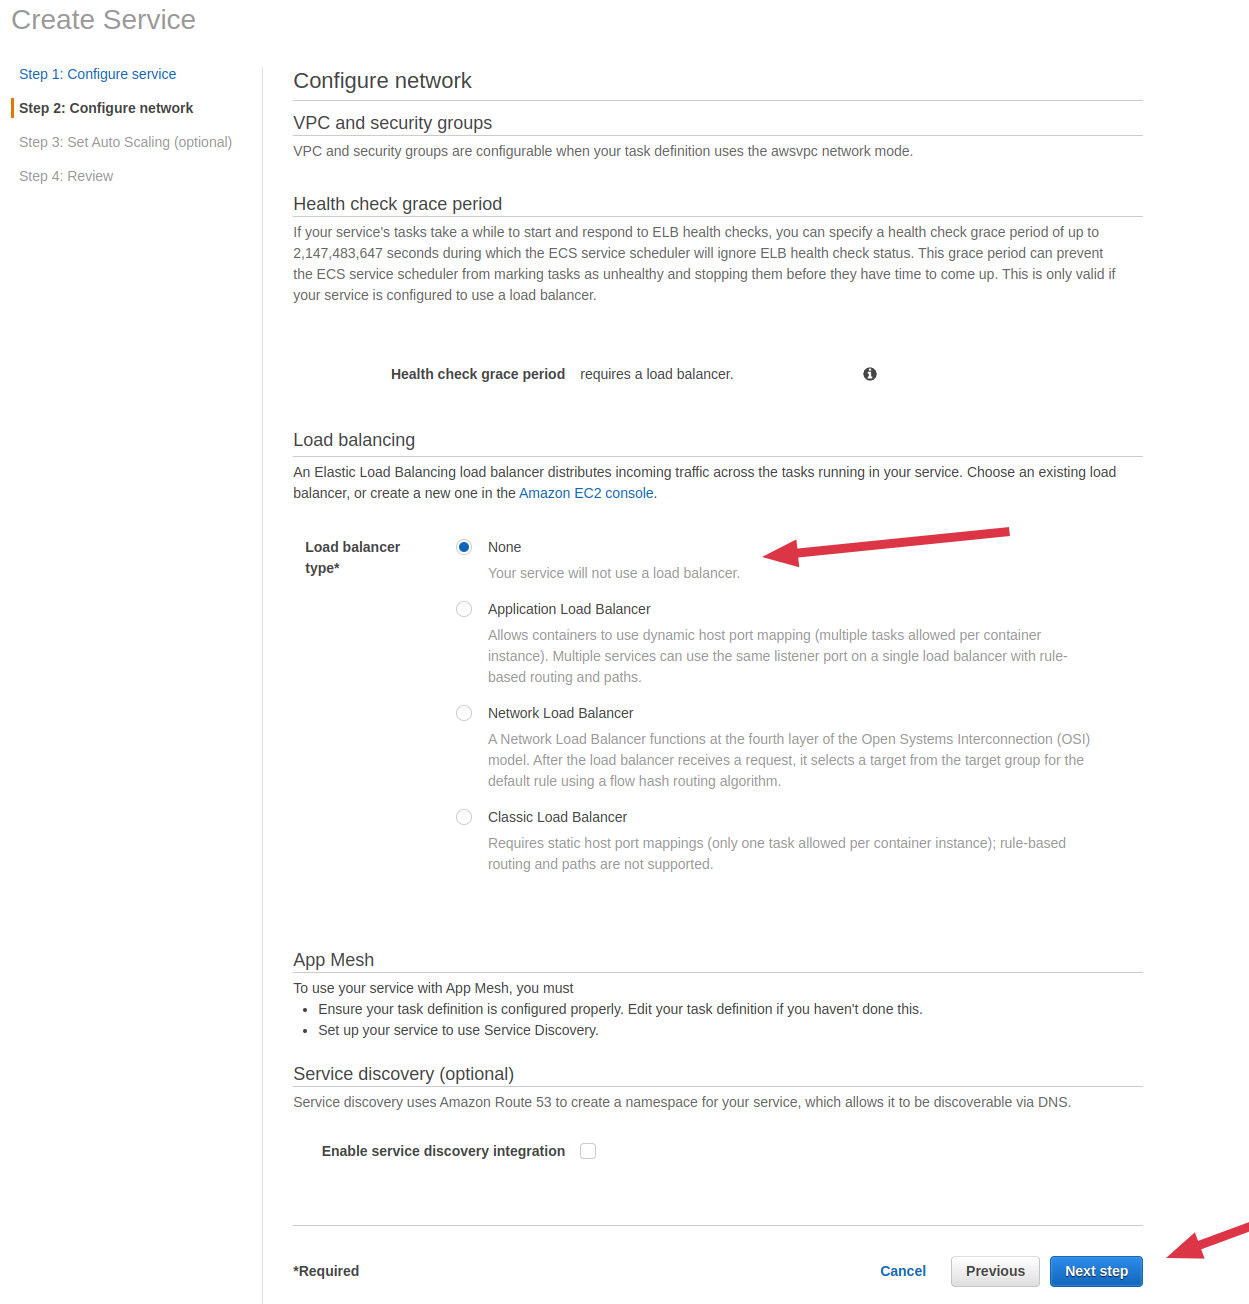
-
Select None in Load balancer type then click on Next Step
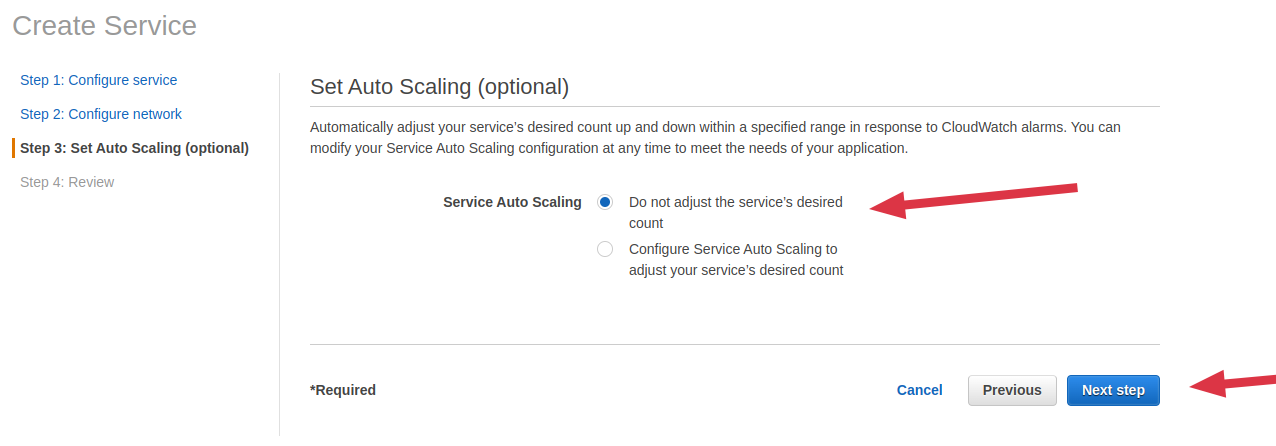
-
Select default value of Set Auto scaling then click on Next Step
-
Review configurations then confirm by clicking on Create Service After service is successfully created, click on View Service to check startup status. The service will automatically start after a few seconds. The service is running okay once the status becomes ACTIVE and the Running tasks count equals Desired tasks count. Visit the EC2 instance IP on PORT 80 to access the Snapshot API
Fargate launch type
Run the Snapshot SDK container without the need to provision or manage the underlying infrastructure. AWS Fargate provides a serverless environment, automatically allocating the necessary CPU and memory resources for your containers. This guide demonstrates how to set up the Snapshot SDK on ECS (Elastic Container Service) using AWS Fargate, with EFS (Elastic File System) for shared storage and CloudWatch for monitoring logs. log monitoring.
Setup instructions using new console experience:
User account creating the cluster should have these permissions besides EFS, EC2 and ECS if not an administrator:
- iam:CreateRole
- iam:AttachRolePolicy
- logs:CreateLogGroup
- logs:CreateLogStream
- iam:ListInstanceProfilesForRole
- iam:AddRoleToInstanceProfile
- iam:CreateInstanceProfile
- iam:AttachRolePolicy
- iam:CreateRole
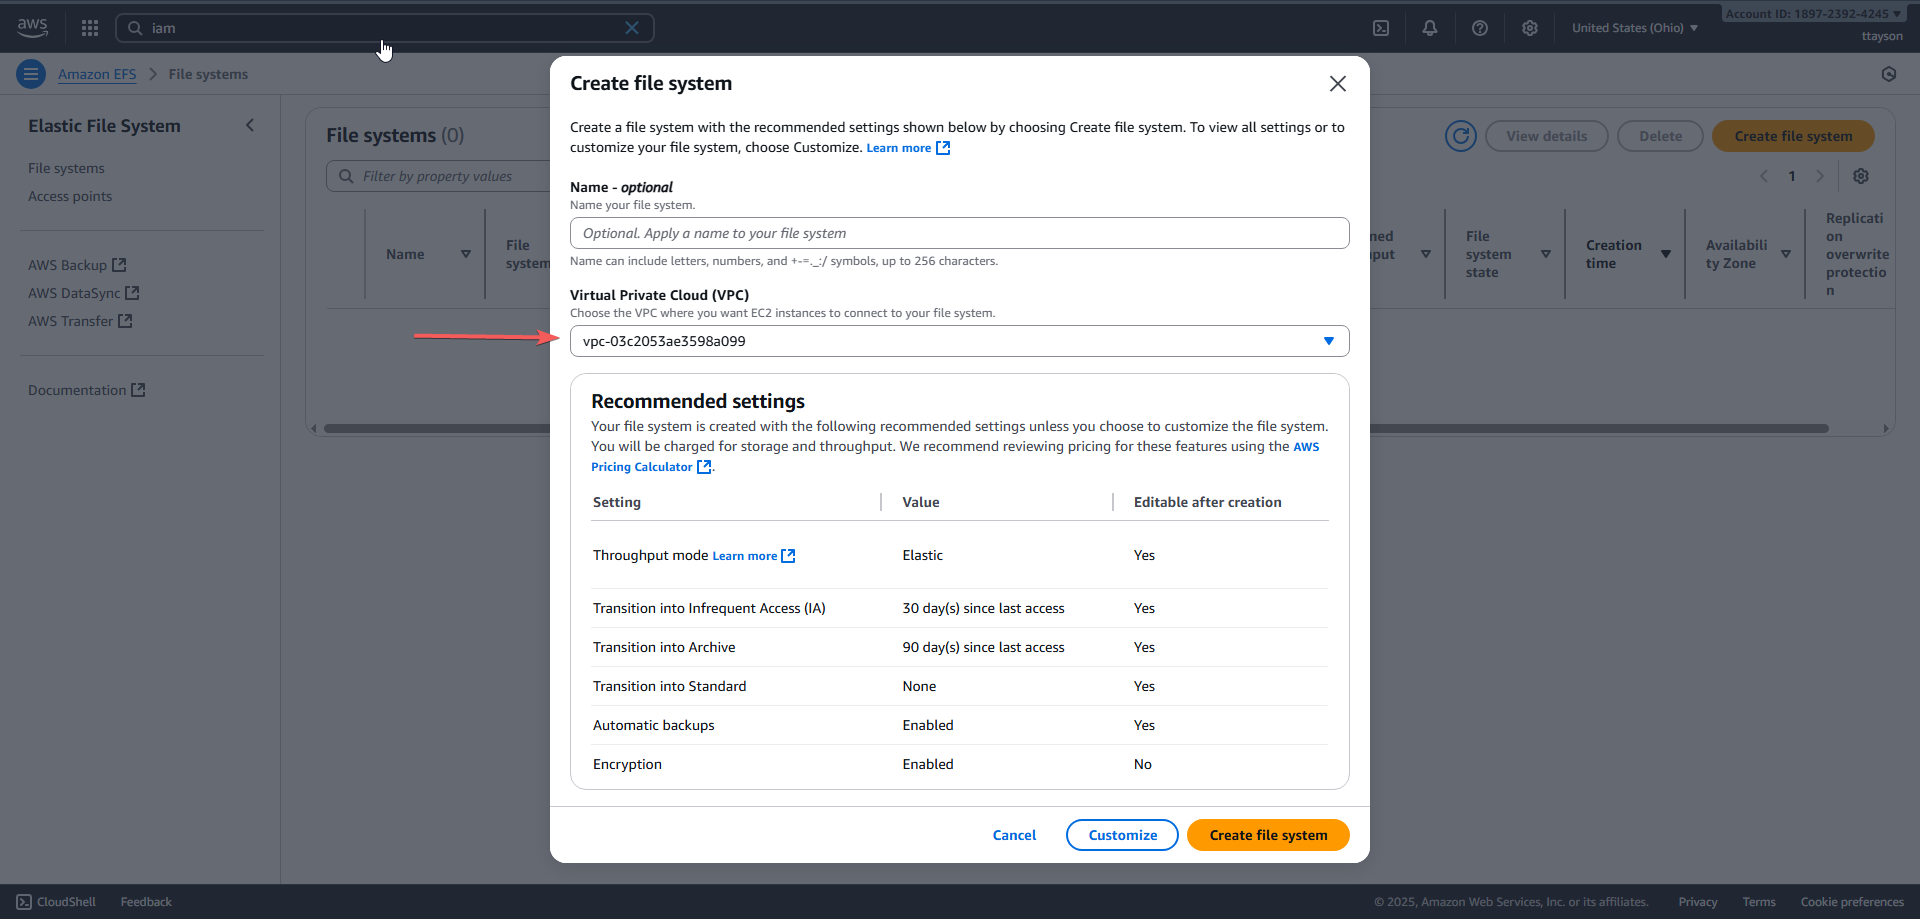
1. Create the EFS (Elastic File System)
The EFS is an elastic file system from AWS, accessible by multiple containers simultaneously. It will be used by our container to store data persistently.
- Go to EFS > File System.
- Make sure to select the correct VPC (the same one used in ECS).
- After creating it, copy the File System ID, which will be needed later.
Note: The Amazon EFS file system, Amazon ECS cluster, and Fargate tasks must all be in the same VPC. Allow inbound connections on port 2049 (Network File System, or NFS) from the security group associated with the service
2. Create a Log Group in CloudWatch
CloudWatch Logs allows you to monitor container logs in real-time. Without it, it would be difficult to identify execution errors.
- Go to CloudWatch > Log groups.
- Create a log group named:
/ecs/snapshot-sdk
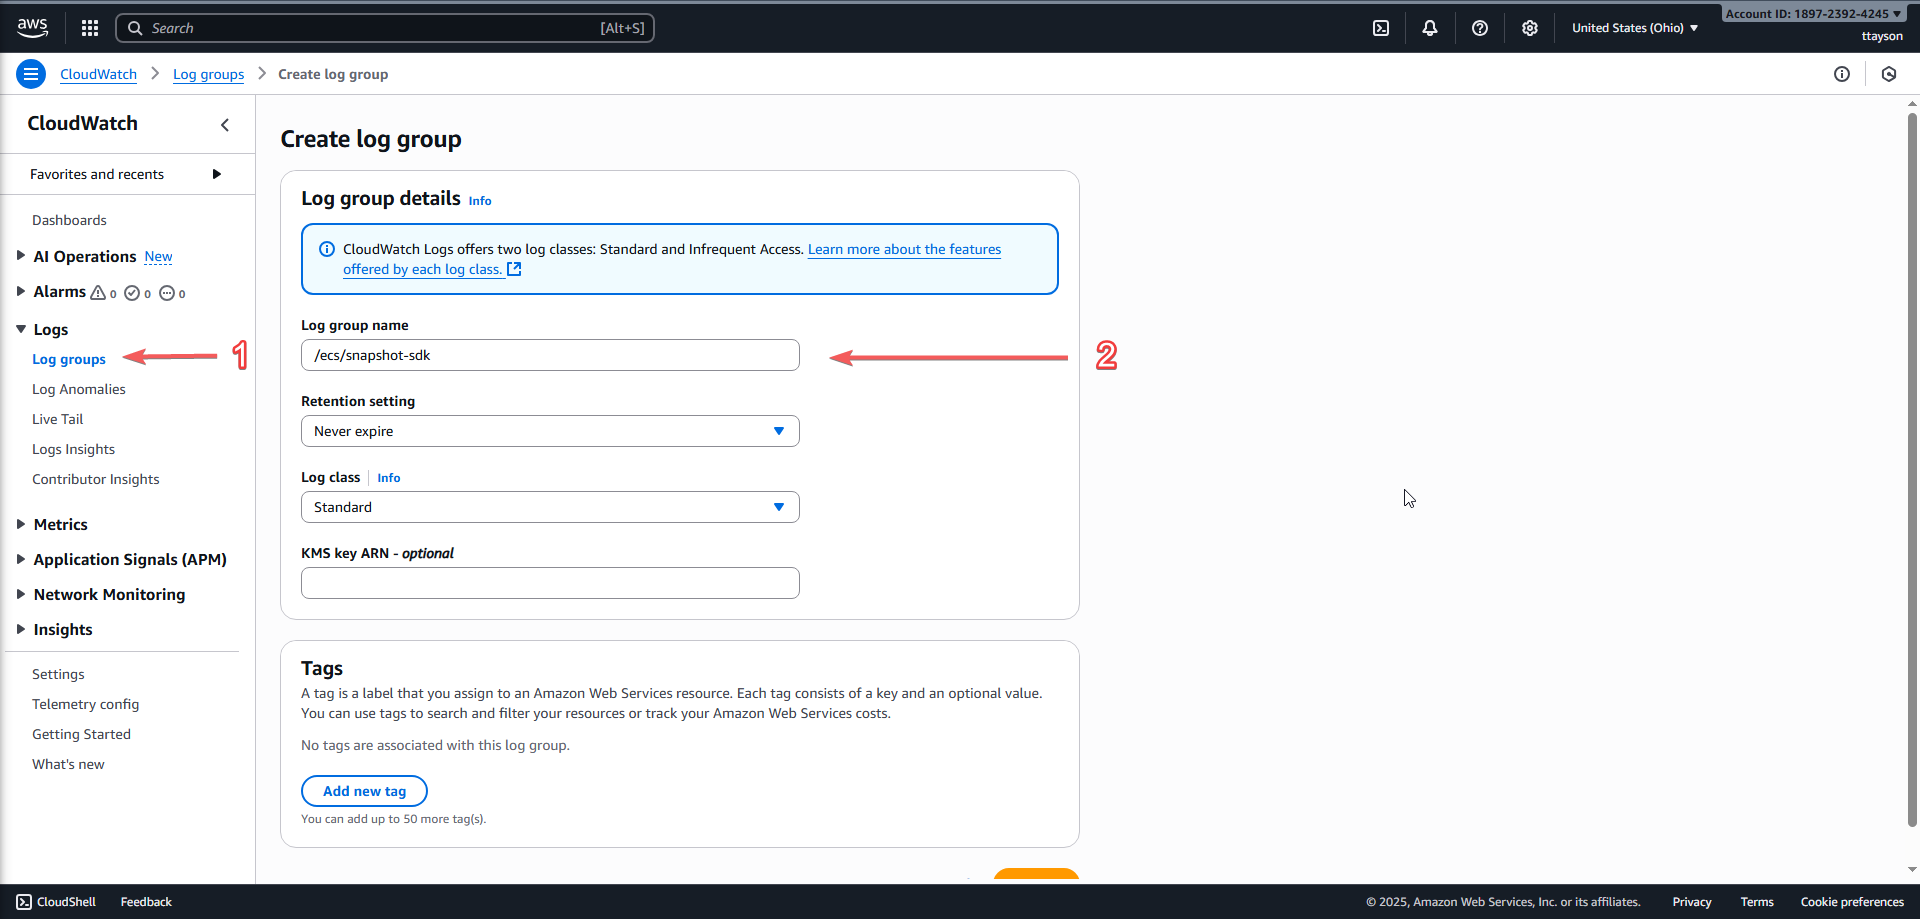
This name will be referenced by ECS when containers start running.
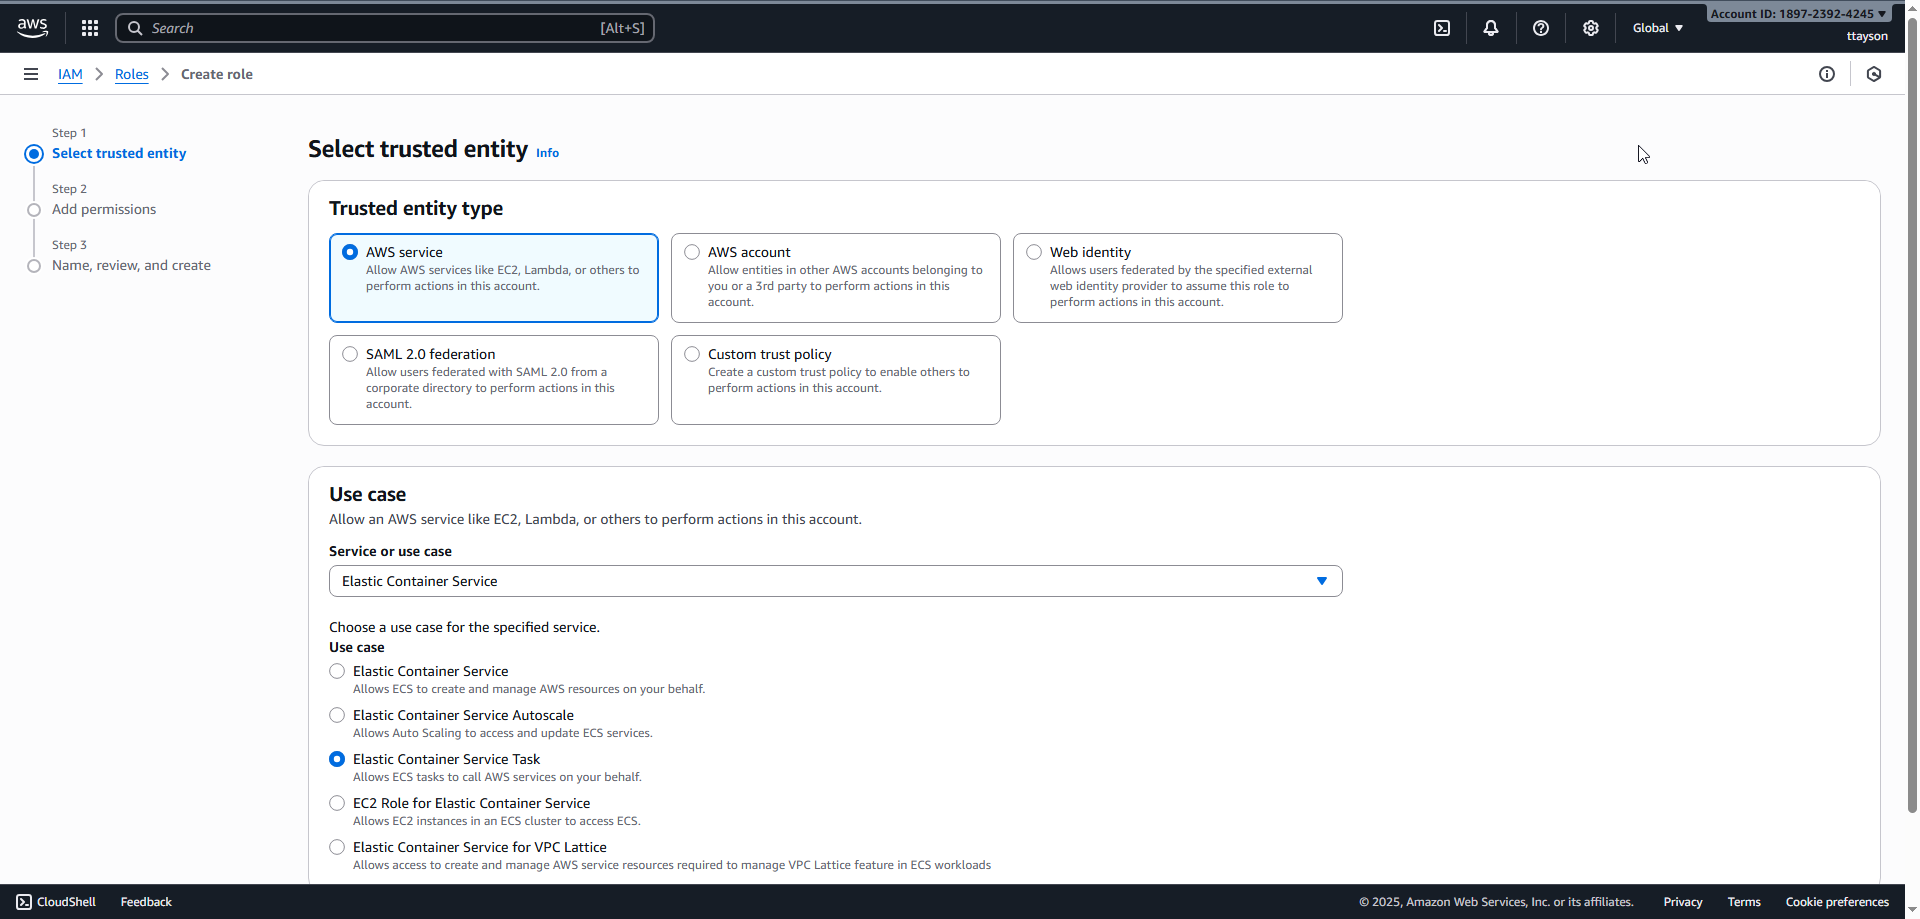
3. Create an IAM Role (Permissions)
The IAM Role acts as an identity with specific permissions that ECS will use to run the task. Without it, the container will not have access to logs, EFS, and other resources. As explained here
-
Go to IAM > Roles > Create Role.
-
For Trusted entity type, choose AWS service.
-
For Service or use case, choose Elastic Container Service, and then choose the Elastic Container Service Task use case.
-
Look for the AmazonECSTaskExecutionRolePolicy and attach it.
- This policy gives ECS permission to pull images, write logs, etc.
-
Set a name for the role and finish the creation.
-
Copy the ARN of the role created (it will be used in the Task Definition).
Example ARN:
arn:aws:iam::189723924245:role/snapshot_sdk

4. Create a Task Definition
The Task Definition is like a "recipe" that describes how the container should run: image, environment variables, volumes, roles, etc.
-
Go to Task Definitions > Create new Task definition (JSON).
-
Insert the provided sample JSON and replace the following:
containerDefinitions.environment.0.value→ your LICENSE_KEYcontainerDefinitions.environment.1.value→ your TOKENvolumes.0.efsVolumeConfiguration.fileSystemId→ EFS FileSystem IDexecutionRoleArn→ ARN of the created Role
-
Save the definition. Every time you change the JSON, a new version of the task will be created.
{
  "family": "platerecognizer-alpr-fargate",
  "containerDefinitions": [
    {
      "cpu": 0,
      "environment": [
        {
          "name": "LICENSE_KEY",
          "value": "YOUR_LICENSE_KEY"
        },
        {
          "name": "TOKEN",
          "value": "YOUR_TOKEN"
        }
      ],
      "essential": true,
      "image": "platerecognizer/alpr",
      "logConfiguration": {
        "logDriver": "awslogs",
        "options": {
          "awslogs-group": "/ecs/snapshot-sdk",
          "awslogs-region": "us-east-2",
          "awslogs-stream-prefix": "snapshot"
        }
      },
      "mountPoints": [
        {
          "containerPath": "/license",
          "readOnly": false,
          "sourceVolume": "license-volume"
        }
      ],
      "name": "snapshot",
      "portMappings": [
        {
          "containerPort": 8080,
          "hostPort": 8080,
          "protocol": "tcp"
        }
      ],
      "systemControls": [],
      "volumesFrom": []
    }
  ],
  "executionRoleArn": "YOUR_ARN_ROLE",
  "networkMode": "awsvpc",
  "volumes": [
    {
      "efsVolumeConfiguration": {
        "fileSystemId": "YOUR_EFS_FileSystem_ID",
        "rootDirectory": "/",
        "transitEncryption": "ENABLED"
      },
      "name": "license-volume"
    }
  ],
  "placementConstraints": [],
  "requiresCompatibilities": ["FARGATE"],
  "cpu": "1024",
  "memory": "2048"
}
5. Create an ECS Cluster
The Cluster is the logical grouping where your tasks and services will run.
- Go to ECS > Clusters > Create Cluster.
- Under Infrastructure, select AWS Fargate (serverless).
- Fargate automatically manages the execution infrastructure without needing to manage EC2 instances.
- Finish creating the cluster.
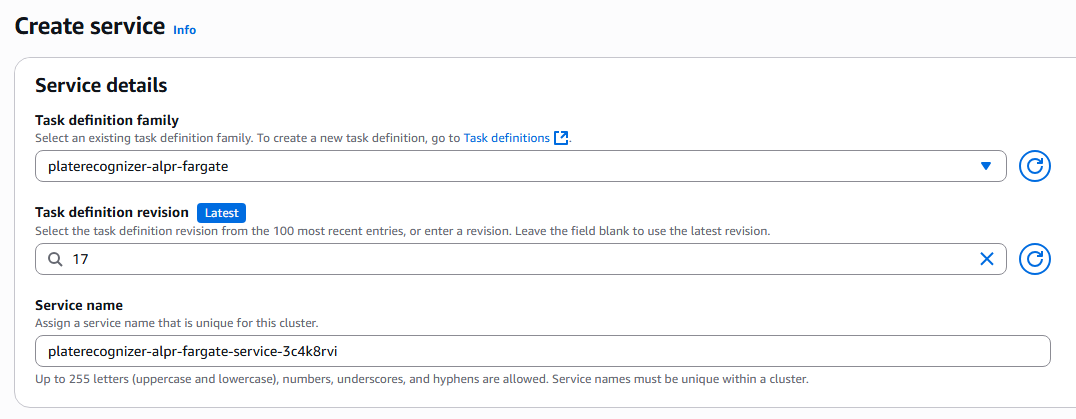
6. Create a Service in the Cluster
The Service keeps your tasks running reliably. It can ensure high availability, automatically scale tasks, and restart them in case of failure.
- Go to the created Cluster.
- Access Services > Create Service.
6.1. Service details
In Service details, select the Task Definition and always use the latest version (as it represents your most recent JSON changes).
6.1. Configure Compute (Environment → Advanced)
Here you define how and where the tasks will run.
-
Launch type = Fargate → runs everything on Fargate, no servers to manage.
-
Capacity provider strategy → allows distributing tasks between Fargate and Fargate Spot (cheaper version, but may be interrupted).
- Base: minimum number of tasks guaranteed on this provider.
- Weight: weight used to balance distribution.
-
Platform version → choose
LATESTto ensure tasks always run on the most up-to-date Fargate version.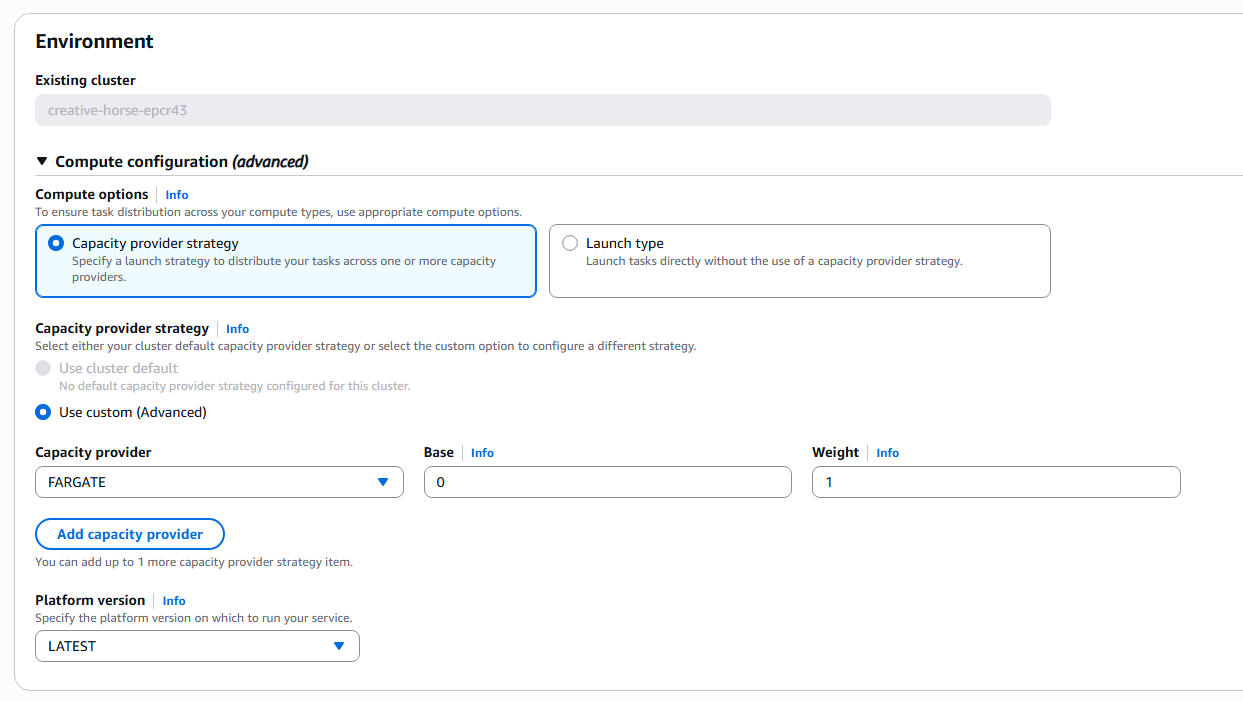
6.1.2 Configure Networking
Here you define network and connectivity so your tasks can communicate with the internet or other services.
- VPC and Subnets → where your tasks will run. Private subnets are recommended for security.
- Security Groups → control which ports and protocols are allowed (e.g., HTTP 80, HTTPS 443).
- Assign Public IP:
- Enabled: the task will have a public IP and can be accessed directly from the internet.
- Disabled: the task can only be accessed within the VPC (recommended if using a Load Balancer).
7. Verify and Monitor Your Service
After reviewing all configurations, click Create Service. The service creation process will begin, and you'll be redirected to the service overview page.
7.1. Check Service Status
- Once the service is created, click View Service to monitor its startup status.
- The service will show PENDING status initially while the container is being provisioned and started.
- Wait for the service status to become ACTIVE and verify that Running tasks count equals Desired tasks count (usually 1).
7.2. Monitor Container Logs
To troubleshoot issues or monitor application startup:
- Go to CloudWatch > Log groups.
- Click on the
/ecs/snapshot-sdklog group you created earlier. - You'll see log streams named with the pattern:
snapshot/snapshot/[task-id]. - Click on the most recent log stream to view real-time container logs.
- Look for startup messages, errors, or API readiness indicators.
Common log messages to look for:
- Container startup and initialization messages
- License validation status
- API server ready messages (usually indicates the service is ready to accept requests)
- Any error messages related to configuration or connectivity
7.3. Access the Snapshot API
Once the service is running successfully:
- In the ECS service page, click on the Tasks tab.
- Click on the running task ID.
- In the task details, find the Public IP address (if you enabled public IP assignment).
- Access your Snapshot API at:
http://[PUBLIC_IP]:8080
To test the API:
- Open your browser and navigate to
http://[PUBLIC_IP]:8080 - You should see the Snapshot SDK API interface
- You can also test with curl:
curl http://[PUBLIC_IP]:8080/info
Elastic Kubernetes Service (EKS)
Amazon EKS is a managed Kubernetes service to run Kubernetes in the AWS cloud and on-premises data centers. In the cloud, Amazon EKS automatically manages the availability and scalability of the Kubernetes control plane nodes responsible for scheduling containers, managing application availability, storing cluster data, and other key tasks.
Setup instructions using AWS CLI:
-
Install AWS CLI and configure Authentication.
-
Install eksctl and use it to create a cluster with the desired number of nodes.
eksctl create cluster --name=cluster-1 --nodes=4 -
After the cluster has been created, the appropriate kubernetes configuration will be added to your kubeconfig file. This is, the file that you have configured in the environment variable
KUBECONFIGor~/.kube/configby default. -
Use the config to connect and proceed with installing the Snapshot Helm charts
kubectl --kubeconfig ~/.kube/config get pods