Stream Cloud Configuration
Once your Stream Cloud license is activated, you need to configure the service using the Stream Config GUI. Follow these steps to ensure proper setup:
- Access the Stream License Panel: Navigate to the Stream License Panel.
- Verify License Availability: Ensure your license appears under the "Cloud Licenses" category.
- Open License Configuration: Click on "Manage" for your license and access the "Configuration" submenu.
Refer to the image below for guidance:
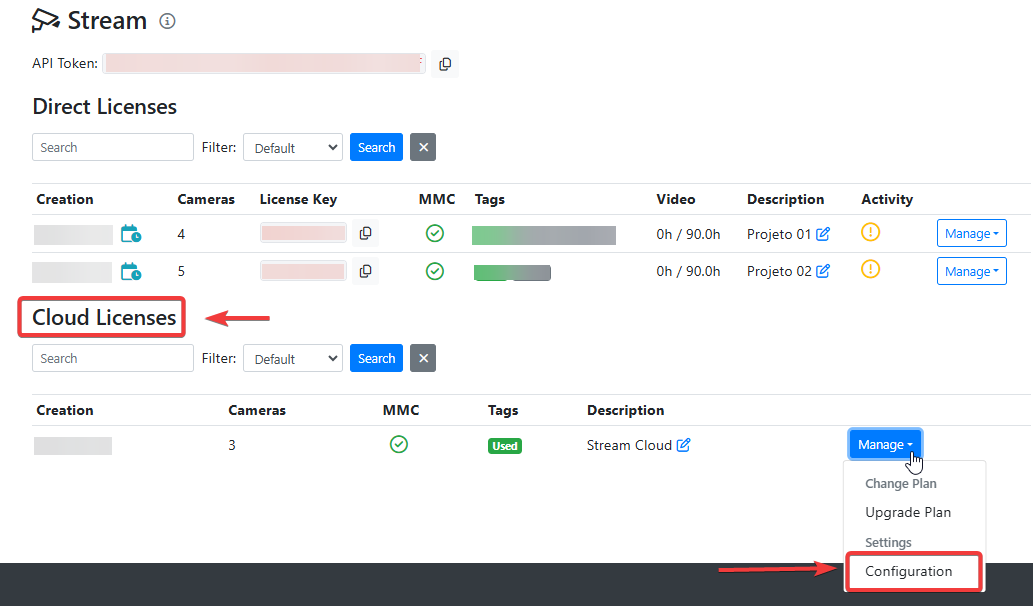
Configuration Menu
Upon accessing the configuration menu, you will see the Basic Settings, which include the default adjustments for Stream Cloud. Most settings are optional. For fine-tuning Stream Cloud, click the Advanced button to explore all available settings. To understand the functionality of each parameter, visit our configuration page.
Advanced settings added in this category apply globally and will be accessible by all added cameras. If you want specific cameras to have unique advanced settings, configure them individually when adding a new camera. This way, only that specific camera will inherit those settings.
Adding a Camera
For Stream Cloud to function properly, you must configure at least one camera. To do this, click the Add Camera button, fill in the required parameters, and enter your camera's RTSP URL and name.

The URL must be externally accessible from your infrastructure.
Output configuration
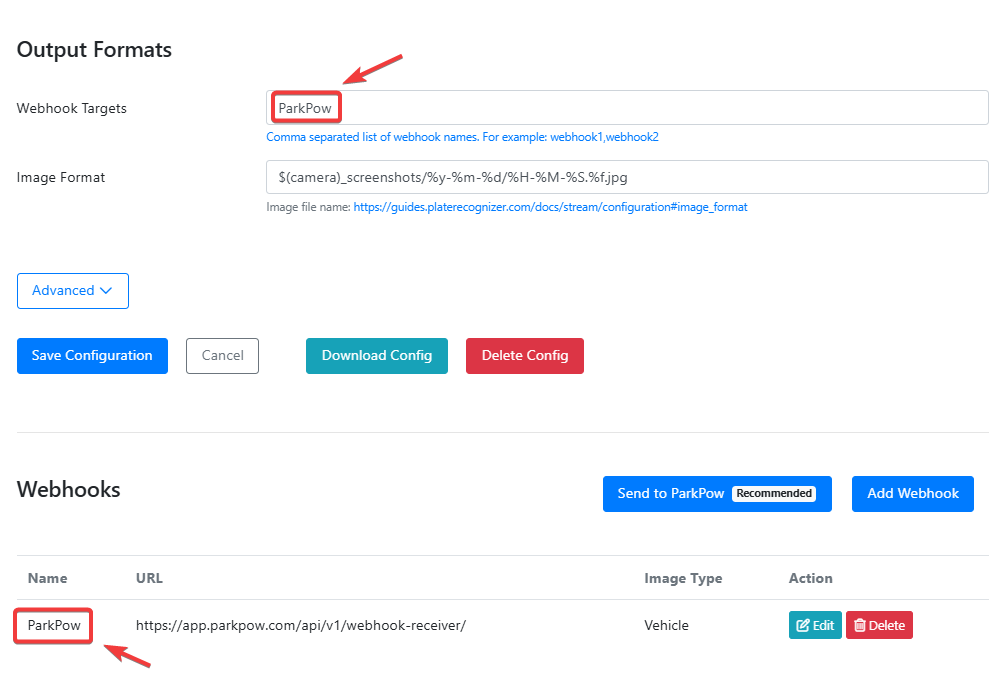
The output configuration is where you can direct the detections performed by Stream Cloud. You can define webhooks to receive these results.
In the Webhooks menu, click the Add Webhook button and provide a name, URL, and any other necessary information for your configuration.
You can also send the data to ParkPow by clicking Send to ParkPow. The token configurations will be automatically added to the webhook.
If your ParkPow account is linked to a different email, click Edit and manually add the corresponding token.
After adding your webhooks, go to Output Formats and, in the Webhook Targets parameter, add the names of the configured webhooks. To ensure webhooks function correctly, remember that these configurations are global and will apply to all cameras. If you want to configure webhooks for specific cameras, go to the Advanced menu in the camera settings and add the webhook individually under the Webhook Targets parameter.
Save
After making your configurations, always click Save to ensure your settings are stored.
That changes may take a few minutes to take effect.
