Amazon Web Services
AWS products able to run Stream:
- Elastic Compute Cloud (EC2)
- Elastic Container Service (ECS)
Need to receive webhooks results in an AWS Lambda function?
You can use our open-source example.
Elastic Compute Cloud (EC2)
Amazon EC2 (Elastic Compute Cloud) is a web service provided by Amazon Web Services (AWS) that allows you to launch and manage virtual servers, known as instances, in the cloud. EC2 provides scalable computing resources, enabling you to easily scale up or down based on your application's demand.
Setup instructions using new console experience:
-
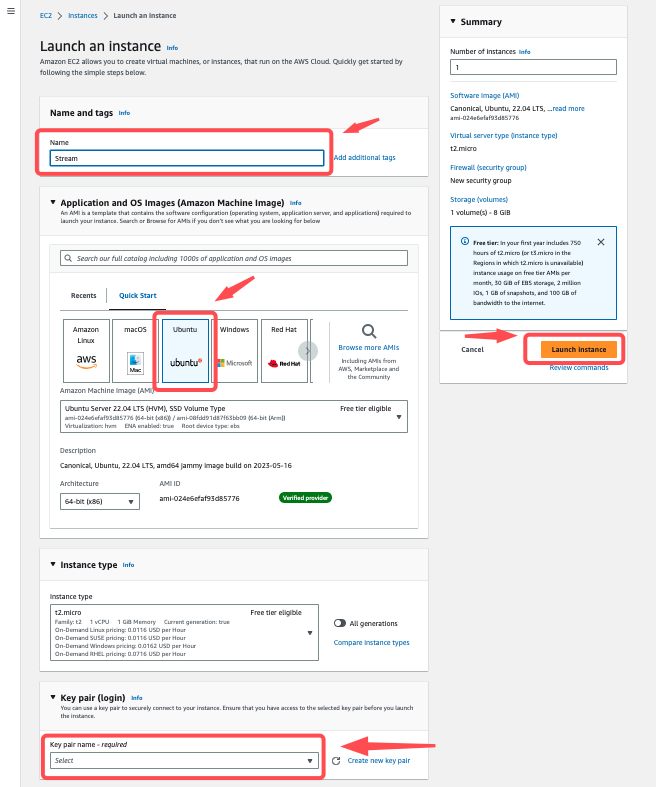
Visit EC2 console for creating a new instance

-
Enter a desired name, Select Ubuntu Amazon machine Image(AMI), Select an SSH Key pair (if you don't have a Key pair, click on the create button, it is important to save the .pem file that will be generated), then click Launch instance You can leave the other options as the default.
-
Once the instance is running and has finished initializing, connect via SSH to begin the installation. The SSH command should look as below:
ssh -i "Stream.pem" [email protected]
- If you get an error
Load key "Stream.pem": bad permissions, Fix it by updating key file permissions by typing the following command in the console:chmod 400 Stream.pem - For other ways of starting an SSH session, select the instance then click on Connect.
- After a successful connection, proceed with Stream installation steps
Elastic Container Service (ECS)
Amazon ECS (Elastic Container Service) is a container orchestration service provided by Amazon Web Services (AWS). It allows you to easily run, manage, and scale containerized applications using AWS's elastic infrastructure.
ECS supports two launch types for containers: EC2 launch type and Fargate launch type. To run Stream, we use ECS with the EC2 launch type.
In ECS with an EC2 launch type, you utilize EC2 instances to run your containers. Here are the key concepts and steps involved:
Create a Cluster
In the ECS console, create a cluster by specifying settings such as the EC2 instance type, define the subnets and cluster name, and follow the steps below for EC2 instance type definitions.

In step 3, it is important to select an SSH key pair so that you can have access to the configuration changes in the config.ini file. This file contains all the configuration parameters for the Stream.
By selecting an SSH key pair, you will be able to establish a secure connection to the EC2 instance where the Stream is running. This will enable you to access and modify the config.ini file as needed to adjust the configuration parameters according to your requirements.
Monitoring Logs (CloudWatch)
It is important to create a log group so that you can access the logs generated by the container, which will facilitate diagnosing and verifying the container's functionality. To create a log group in Amazon CloudWatch that can be used for logging purposes later, follow these steps:
- Navigate to the CloudWatch service by searching for "CloudWatch" in the search bar.
- In the CloudWatch console, click on "Logs" in the sidebar menu and then click on "Log groups".
- On the Log groups page, click the "Create log group" button.
- Choose a name for the log group that will be used for identification and organization. It is recommended to use a descriptive name that reflects the purpose or application associated with the logs.
- Click the "Create" button to create the log group.
Once the log group is created, you can configure your container to send logs to this group in CloudWatch. This will enable you to easily access and analyze the logs, aiding in troubleshooting and monitoring the container's performance.
By creating a log group in CloudWatch, you establish a centralized location for storing and managing logs, simplifying the process of monitoring and diagnosing container behavior.
Create new Task Definition
In the context of creating a container service in AWS, tasks play a crucial role. They represent the individual instances of containers that perform the actual work. Tasks can be created, configured, and managed through Amazon Elastic Container Service (ECS) or AWS Fargate.
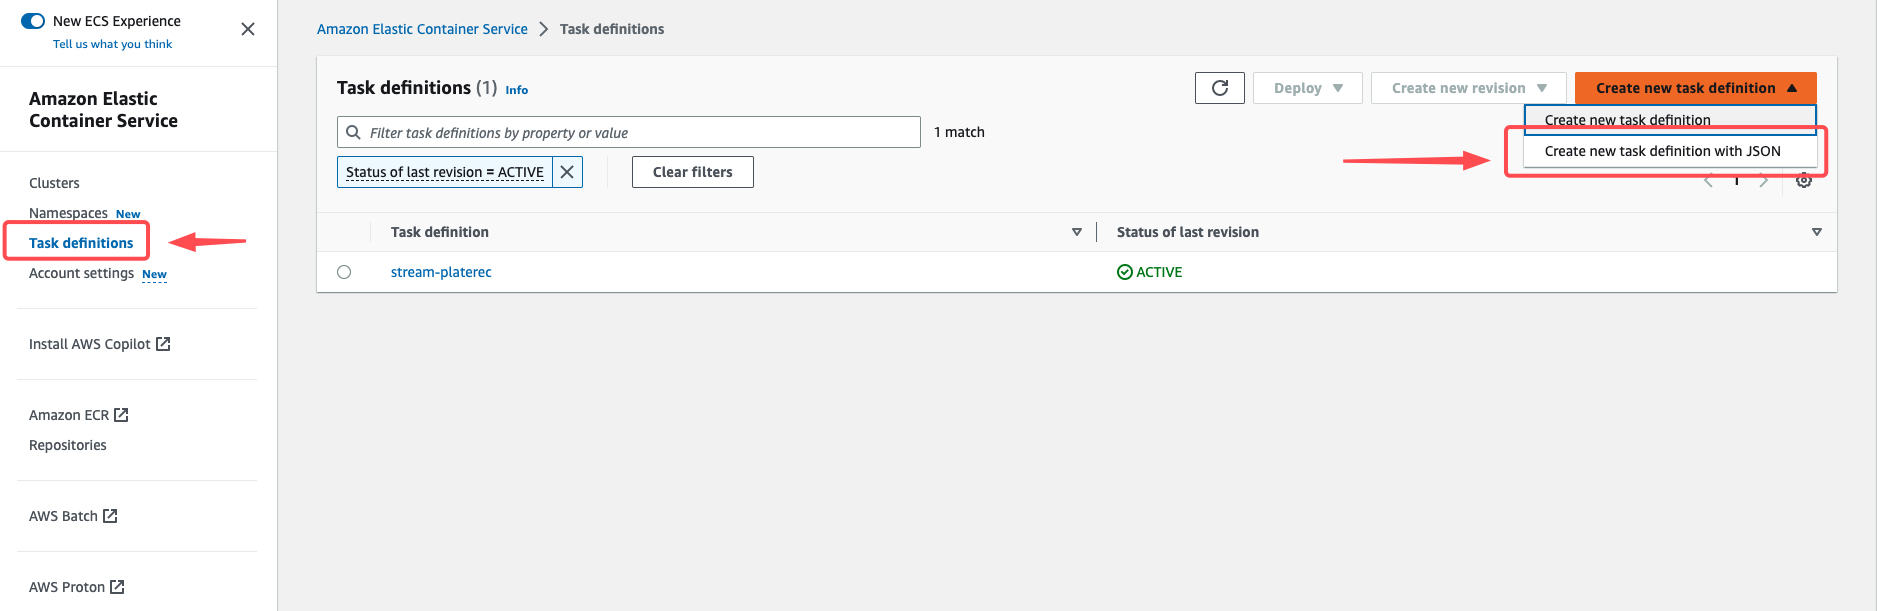
Still in the cluster creation panel, to create a new task, access the sidebar menu and click on "Task Definitions". On the new page, click on "Create new task definition" and then on "Create new task definition with JSON".
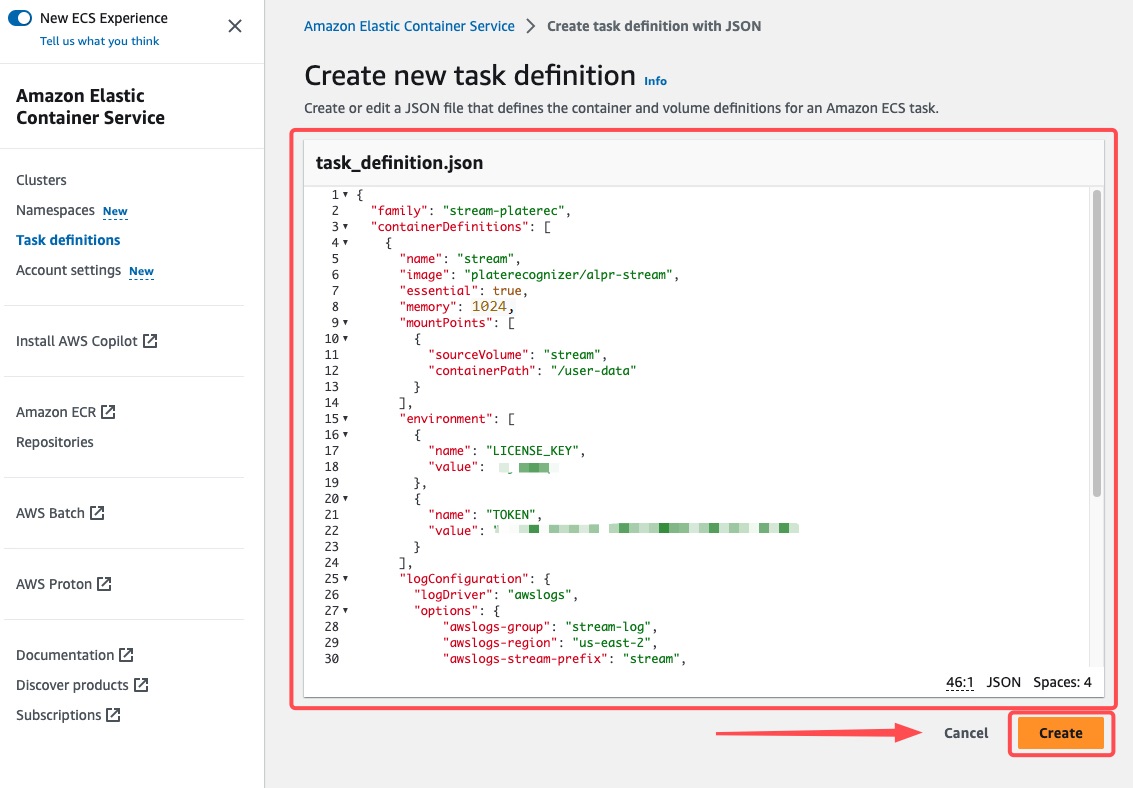
Below you can find an example JSON with the basic configurations for the Stream instance. In this JSON, you must include the TOKEN, LICENSE_KEY, and the name of the previously configured GROUP_LOG. Paste the JSON in the given field and click create.
Ensure to configure the right amount of memory (RAM) in your containerDeinition memory parameter, for the matter of this guide we configured it at 1024 Mb.
{
  "family": "stream-platerec",
  "containerDefinitions": [
    {
      "name": "stream",
      "image": "platerecognizer/alpr-stream",
      "essential": true,
      "memory": 1024,
      "mountPoints": [
        {
          "sourceVolume": "stream",
          "containerPath": "/user-data"
        }
      ],
      "environment": [
        {
          "name": "LICENSE_KEY",
          "value": "XXXXXXXXXX"
        },
        {
          "name": "TOKEN",
          "value": "YYYYYYYYY"
        }
      ],
      "logConfiguration": {
        "logDriver": "awslogs",
        "options": {
          "awslogs-group": "GROUP_LOG",
          "awslogs-region": "us-east-2",
          "awslogs-stream-prefix": "stream",
          "awslogs-create-group": "true"
        }
      }
    }
  ],
  "volumes": [
    {
      "name": "stream",
      "host": {
        "sourcePath": "/stream"
      }
    }
  ]
}
I highly recommend using AWS Secrets Manager to enhance the security of your secrets in the cloud infrastructure. With AWS Secrets Manager, you can securely store and protect passwords, API keys, and other sensitive data, minimizing the risk of exposure. Additionally, Secrets Manager provides automatic password rotation, native integration with other AWS services, and advanced auditing capabilities. Strengthen the security of your applications with this powerful solution from AWS. See more here.
The JSON file contains the basic configurations for execution. If needed, please review the file for accuracy. Please ensure that the JSON file is correctly configured according to your requirements.
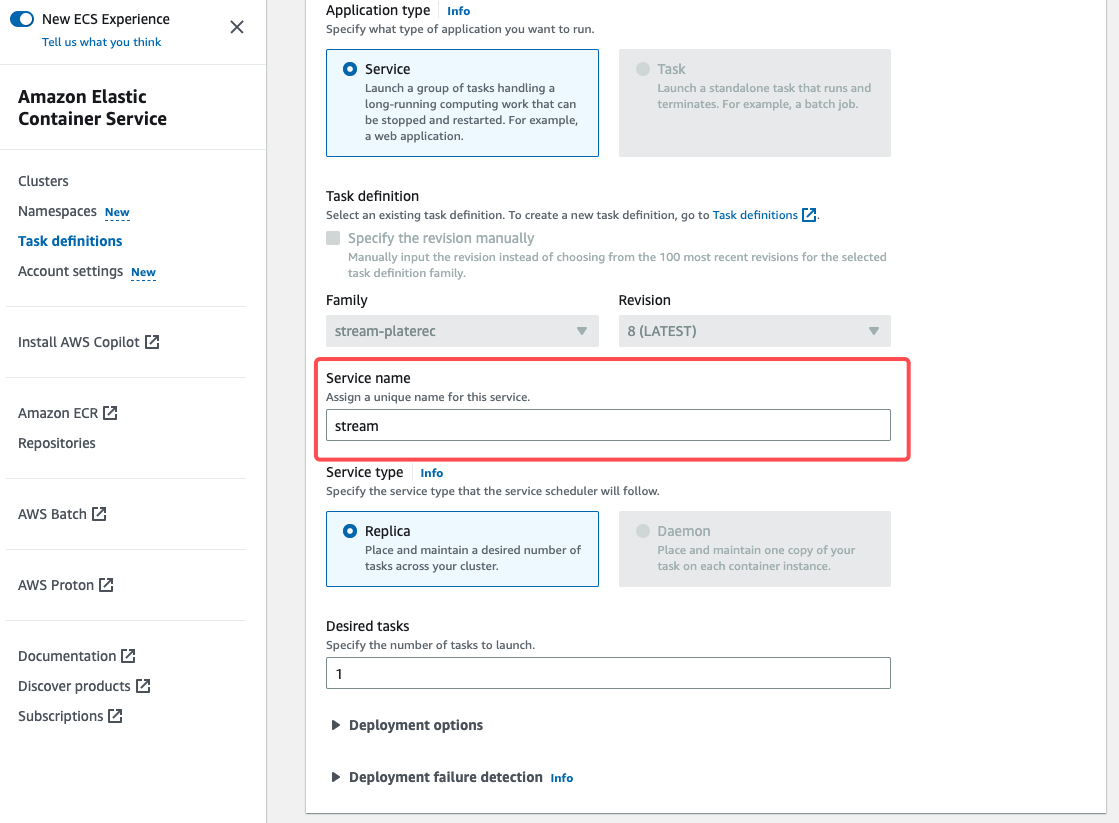
Creating a New Service
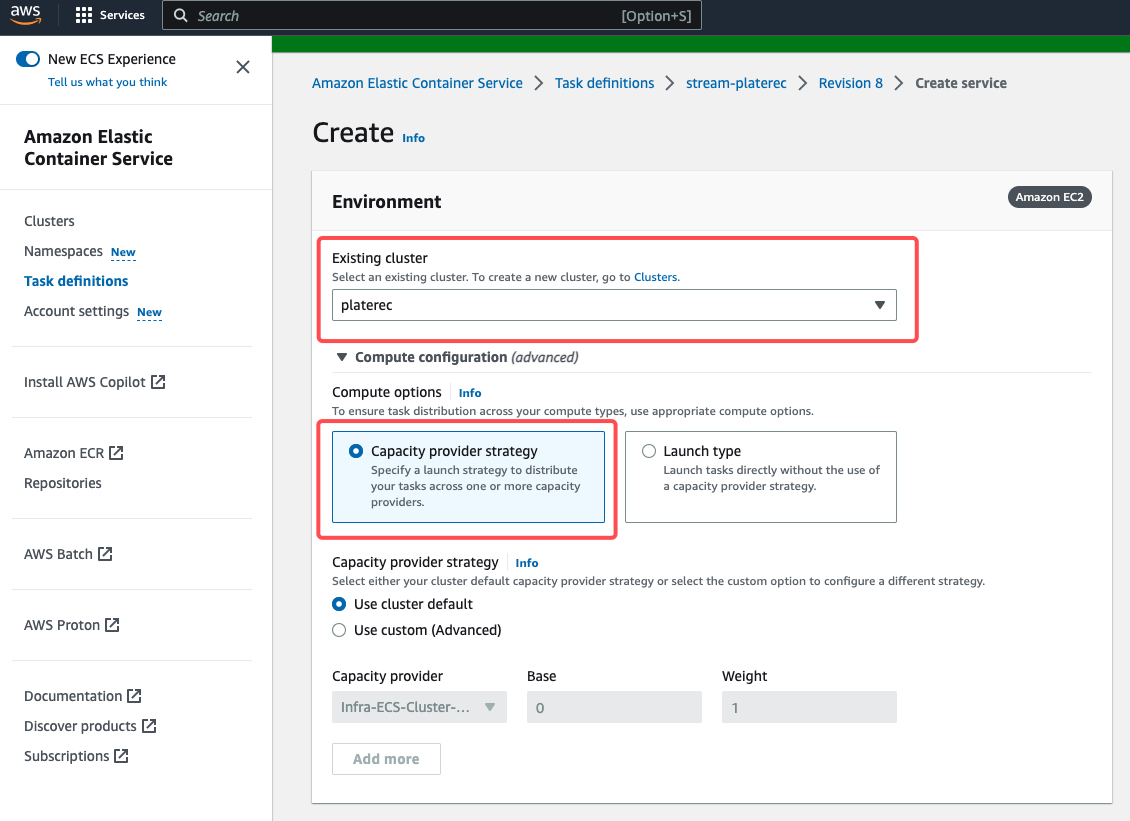
Access the created cluster, go to the Services tab, and click on "Create". A new page will open asking for service configurations. Select the already created cluster, provide the name and revision of the previously created task, and set a name for the new service.
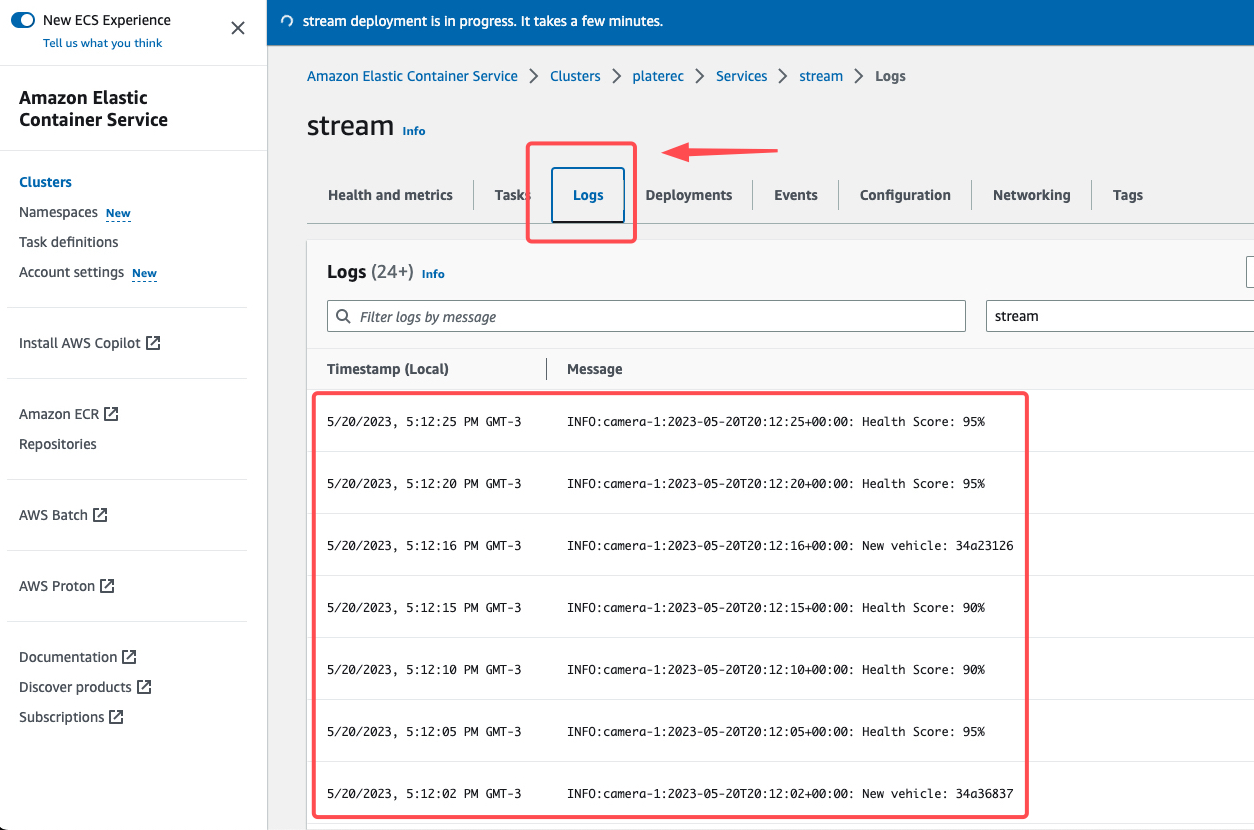
After creating the service, the container will start running, and you can check the container logs in the AWS CloudWatch service. Alternatively, you can access the service and click on "LOGS" to view the logs.
Incase of a failed service startup or taking too long:
- Check the service events by clicking on the service.
- Check the container logs on AWS Cloudwatch.
- SSH into the EC2 instance and check container logs using docker commands.
Changing Stream Settings
To modify the configuration of the Stream, you need to make changes in the config.ini file. To access this file, you must SSH into the EC2 instance.
The config.ini file can be found at the sourcePath specified in the JSON configuration. Once you locate the file, you can make the necessary modifications to the configuration settings.
After making the changes, you need to restart the service for the modifications to take effect, to restart the service, follow the steps below.
- Select the cluster containing the service;
- Choose the service you want to restart;
- Click the "Update" button;
- Check the "Force new deployment" option;
- Skip to the review page;
- click "Update service";
The service will be restarted with the new configurations or simply restarted without changes.