AXIS cameras
New in version 1.53.0.
Supported AXIS cameras
You can run Stream directly on AXIS cameras, no need for a separate server machine or a Cloud. Currently we only support Container capable cameras with ARTPEC-8 and newer processors. To check if your camera can run Stream go to AXIS Product Selector, scroll down and choose System-on-chip: ARTPEC-8, tick Container support box. All remaining cameras should work.
We recommend updating AXIS OS to the latest version before proceeding. Our software was tested to work on OS versions 11.8 and above. We also highly recommend using SD card, as there might not be enough internal storage on your device.
AXIS cameras have limited hardware resources and storage space. It is advised to not enable any unnecessary features in the config, like JSONLines File, CSV File, Video Clips and also disable AXIS built-in smart functions, like Object Analytics and Metadata Producers.
Setup instructions
Install Docker Daemon
Download latest version of Docker ACAP signed .eap file from Releases that is compatible with your system architecture. Navigate to Apps section of your camera's Web Interface, click on + Add app, select the .eap file then click Install. Uninstall all the other Apps in case storage space is critical.
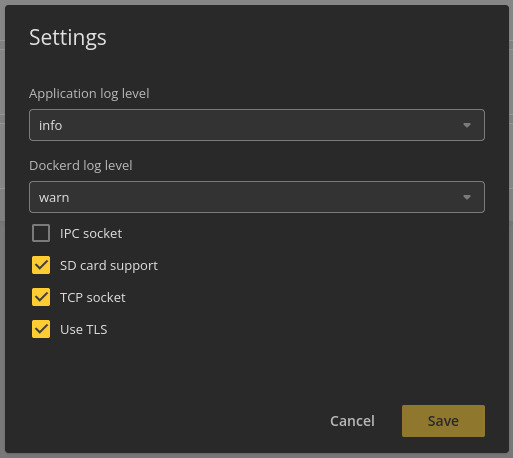
After Docker Daemon shows in the list of apps, go to its Settings. TCP socket should be enabled by default. Enable SD card support if you have SD card plugged into the camera. For extra security enable Use TLS by following full instructions to secure the docker ACAP and the camera. Or run the Step-By-Step TLS commands below on your local machine.
Step-By-Step TLS
   # Generate certificates: openssl needs to be installed in your system
   openssl genrsa -aes256 -out ca-key.pem 4096  # come up with a good <PASSPHRASE>
   openssl req -new -x509 -days 365 -key ca-key.pem -sha256 -out ca.pem  # <PASSPHRASE> first, other fields could be blank
   openssl genrsa -out server-key.pem 4096
   openssl req -sha256 -new -key server-key.pem -out server.csr  # same fields as in step 2
   echo subjectAltName = IP:<CAMERA_IP>,IP:127.0.0.1 >> extfile.cnf  # your <CAMERA_IP> needed here
   echo extendedKeyUsage = serverAuth >> extfile.cnf
   openssl x509 -req -days 365 -sha256 -in server.csr -CA ca.pem -CAkey ca-key.pem -CAcreateserial -out server-cert.pem -extfile extfile.cnf
   openssl genrsa -out client-key.pem 4096
   openssl req -subj '/CN=client' -new -key client-key.pem -out client.csr
   echo extendedKeyUsage = clientAuth > extfile-client.cnf
   openssl x509 -req -days 365 -sha256 -in client.csr -CA ca.pem -CAkey ca-key.pem -CAcreateserial -out client-cert.pem -extfile extfile-client.cnf  # <PASSPHRASE> again

   # Load certificated into camera: replace with real <CAMERA_USER>, <CAMERA_PASS> and <CAMERA_IP>
   curl --anyauth -u "<CAMERA_USER>:<CAMERA_PASS>" -F file=@ca.pem -X POST http://<CAMERA_IP>/local/dockerdwrapper/ca.pem
   curl --anyauth -u "<CAMERA_USER>:<CAMERA_PASS>" -F file=@server-cert.pem -X POST http://<CAMERA_IP>/local/dockerdwrapper/server-cert.pem
   curl --anyauth -u "<CAMERA_USER>:<CAMERA_PASS>" -F file=@server-key.pem -X POST http://<CAMERA_IP>/local/dockerdwrapper/server-key.pem

   # Check that everything works. Should see: "REPOSITORY TAG IMAGE ID CREATED SIZE"
   docker --tlsverify --tlscacert=ca.pem --tlscert=client-cert.pem --tlskey=client-key.pem --host tcp://<CAMERA_IP>:2376 images
Refresh the page after a minute to confirm the app stays running and there hasn’t been an error.
The Docker daemon on the camera listens on tcp port 2376, you should now be able to connect to it from a local Docker client on a computer and execute docker commands. To specify the daemon to connect to, add
--tlsverify --tlscacert=ca.pem --tlscert=client-cert.pem --tlskey=client-key.pem -H=tcp://<CAMERA_IP>:2376
to all docker commands. We will refer to those flags as <TLS_FLAGS> below.
You may want to disable Use TLS to troubleshoot installation. In that case use simple
-H=tcp://<CAMERA_IP>:2375
as <TLS_FLAGS> below.
Set up config.ini in the Web interface
To avoid using SSH and copying config.ini onto the camera, we recommend setting up Web config for your License. Go to Stream -> Manage -> Configuration. Stream will then automatically download config.ini from our server on the first run.
At the moment Stream might not be able to support camera's maximum resolution due to hardware constraints. We recommend starting with 720p resolution as config URL parameter. You can set up a dedicated Stream profile for that in your camera's Web Interface, or simply use a substream as URL: rtsp://<CAMERA_USER>:<CAMERA_PASS>@<CAMERA_IP>/axis-media/media.amp?resolution=1280x720&fps=15.
You may later try increasing resolution and FPS by changing the URL, but keep monitoring Stream's Health Score in docker logs. It should stay above 75%.
Run Stream
Run the below command to pull Stream docker image and run it on the camera:
- Windows
- Linux
docker <TLS_FLAGS> run ^
   -d ^
   --restart="unless-stopped" ^
   --name stream ^
   --group-add 2 ^
   -v /run/dbus/system_bus_socket:/run/dbus/system_bus_socket ^
   -v /usr/lib:/larod_lib ^
   -v user-data:/user-data ^
   -e LICENSE_KEY=XXXXX ^
   -e TOKEN=YYYYY ^
   platerecognizer/alpr-stream:arm
docker <TLS_FLAGS> run \
   -d \
   --restart="unless-stopped" \
   --name stream \
   --group-add 2 \
   -v /run/dbus/system_bus_socket:/run/dbus/system_bus_socket \
   -v /usr/lib:/larod_lib \
   -v user-data:/user-data \
   -e LICENSE_KEY=XXXXX \
   -e TOKEN=YYYYY \
   platerecognizer/alpr-stream:arm
In case you are running without SD card and receive "no space left on device" error message, you may try platerecognizer/alpr-stream:arm-lite docker image instead.
Flag -d will start Stream in the background, use -t instead for troubleshooting. Two extra volume -v ... flags are needed to access camera's hardware accelerator, extra --group-add 2 flag is needed for SD card support. Also notice the lack of --user ... flag from other guides. Stream must use docker daemon's default user.
You can stop Stream with:
docker <TLS_FLAGS> stop stream
or follow logs with:
docker <TLS_FLAGS> logs -f stream
View detection results
Enable Webhooks or ParkPow in your config to receive detection results on a remote machine. We recommend enabling caching if camera's internet access is intermittent.