ParkPow Integrations
It is easy to feed ALPR data into ParkPow! See the pre-integrations below as well as the option for a custom integration.
Send Vehicle Data to ParkPow
| Product | Instructions |
|---|---|
| Snapshot Cloud | Integration Steps |
| Snapshot SDK | Integration Steps |
| Stream | Integration Steps |
| FTP | Integration Steps |
| REKOR Scout | Integration Steps |
| UTMC | Integration Steps |
| Blue Iris (via Snapshot Cloud) | Integration Steps |
| Cisco Meraki (via Snapshot Cloud) | Integration Steps |
| Axis (via Snapshot Cloud) | Integration Steps |
| Axis LPR | Setup forwarder on premise |
| IP Configure | No additional work needed. LPR data is automatically sent to ParkPow. |
| EEN | No additional work needed. LPR data is automatically sent to ParkPow. |
| NX Cloud | No additional work needed. LPR data is automatically sent to ParkPow. |
| Verkada LPR | Send LPR data onPremise or using CF Workers |
| Hikvision LPR | Setup forwarder on premise |
| Genetec LPR | Setup forwarder on premise |
| Custom Integration | Integration Steps via ParkPow API. |
Snapshot Cloud
ParkPow uses a webhook to receive ALPR data from Plate Recognizer Snapshot Cloud. Once you get ParkPow Cloud, it should be enabled by default. If not, follow these steps to enable it.
Requirements
- A ParkPow account. You can sign up for a free trial here.
- Snapshot Cloud. You can get a license here. It's already included when you sign up for a free trial. Please refer to Snapshot Cloud documentation for more information.
Add Webhook Automatically
-
Login to Plate Recognizer Snapshot Cloud Settings and go to Settings as shown in the image below. Enable the webhook by clicking Configure button.

-
Make sure that your ParkPow token is set, and that it is correct. You can get your ParkPow API Token by following this step.
cautionCheck that the ParkPow Token matches the one for your ParkPow account.
If not set, enter it in the ParkPow Token field, then click on the Save button.
-
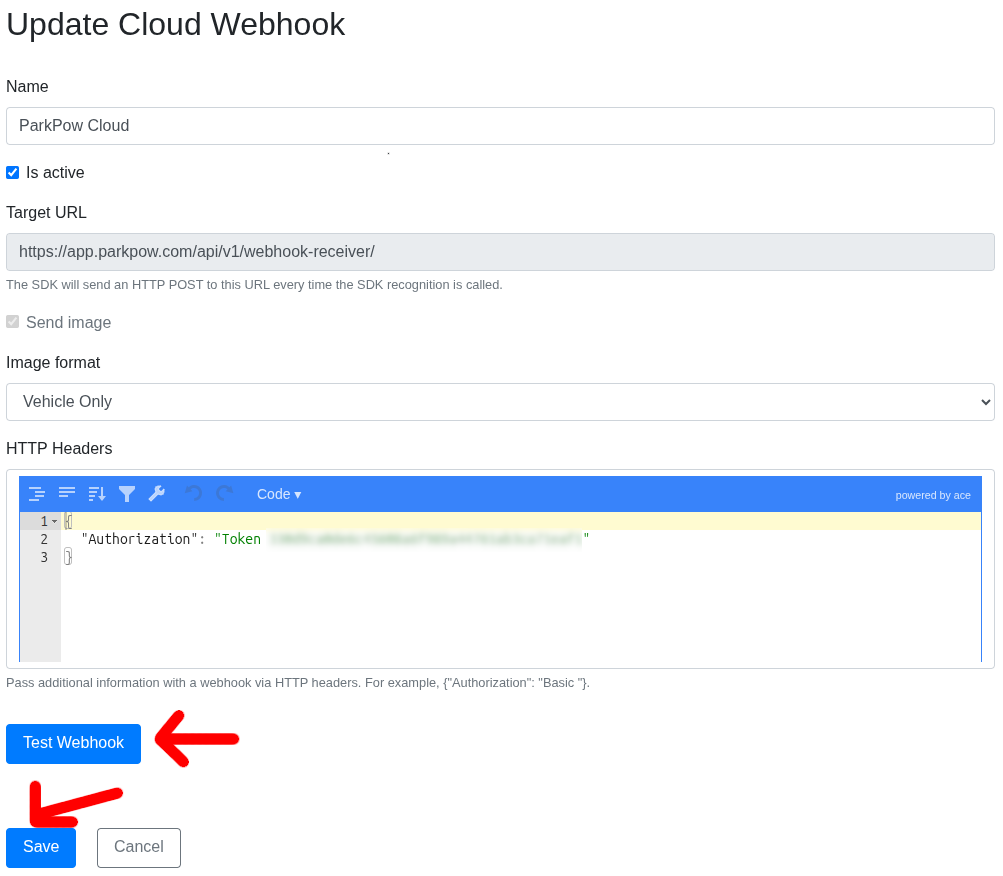
In the Update Cloud Webhook screen:
You can decide to send image only of the vehicle, or the full image
cautionFor ParkPow On-Premise, please make sure to replace the Target URL with your ParkPow domain, e.g.,
https://parkpow.example.com/api/v1/webhook-receiver/.- Please make sure to have HTTPS set up properly, we recommend using a Let's Encrypt certificate. Avoid using self-signed certificates.
- If a different port is in use, set it with a colon after the domain, e.g.,
https://parkpow.example.com:8443/api/v1/webhook-receiver/. - If using a sub-path, make sure to include it in the URL, e.g.,
https://parkpow.example.com/subpath/api/v1/webhook-receiver/.
In order to test, you can click on the Test Webhook button to send a test payload to ParkPow.
-
Once done, you can save the configuration.
-
Go to the ParkPow app to set up your environment, such as your sites, cameras, time zone, etc.
You can also set up the webhook on your own by following the steps in the next section, Add Webhook Manually. In the first step, you have to go to the Snapshot Cloud Webhooks Settings page instead.
Snapshot SDK
You can send ALPR data from Plate Recognizer Snapshot On-Premise SDK straight into ParkPow.
Requirements
- A ParkPow account. You can sign up for a free trial here.
- Snapshot SDK. You can get a free trial license here. Please refer to Snapshot SDK documentation for more information.
Add Webhook Automatically
-
Login to Plate Recognizer, and go to Snapshot SDK Settings. Locate the license where you want to add the webhook. In the same row, click the Manage dropdown and select ParkPow Config.
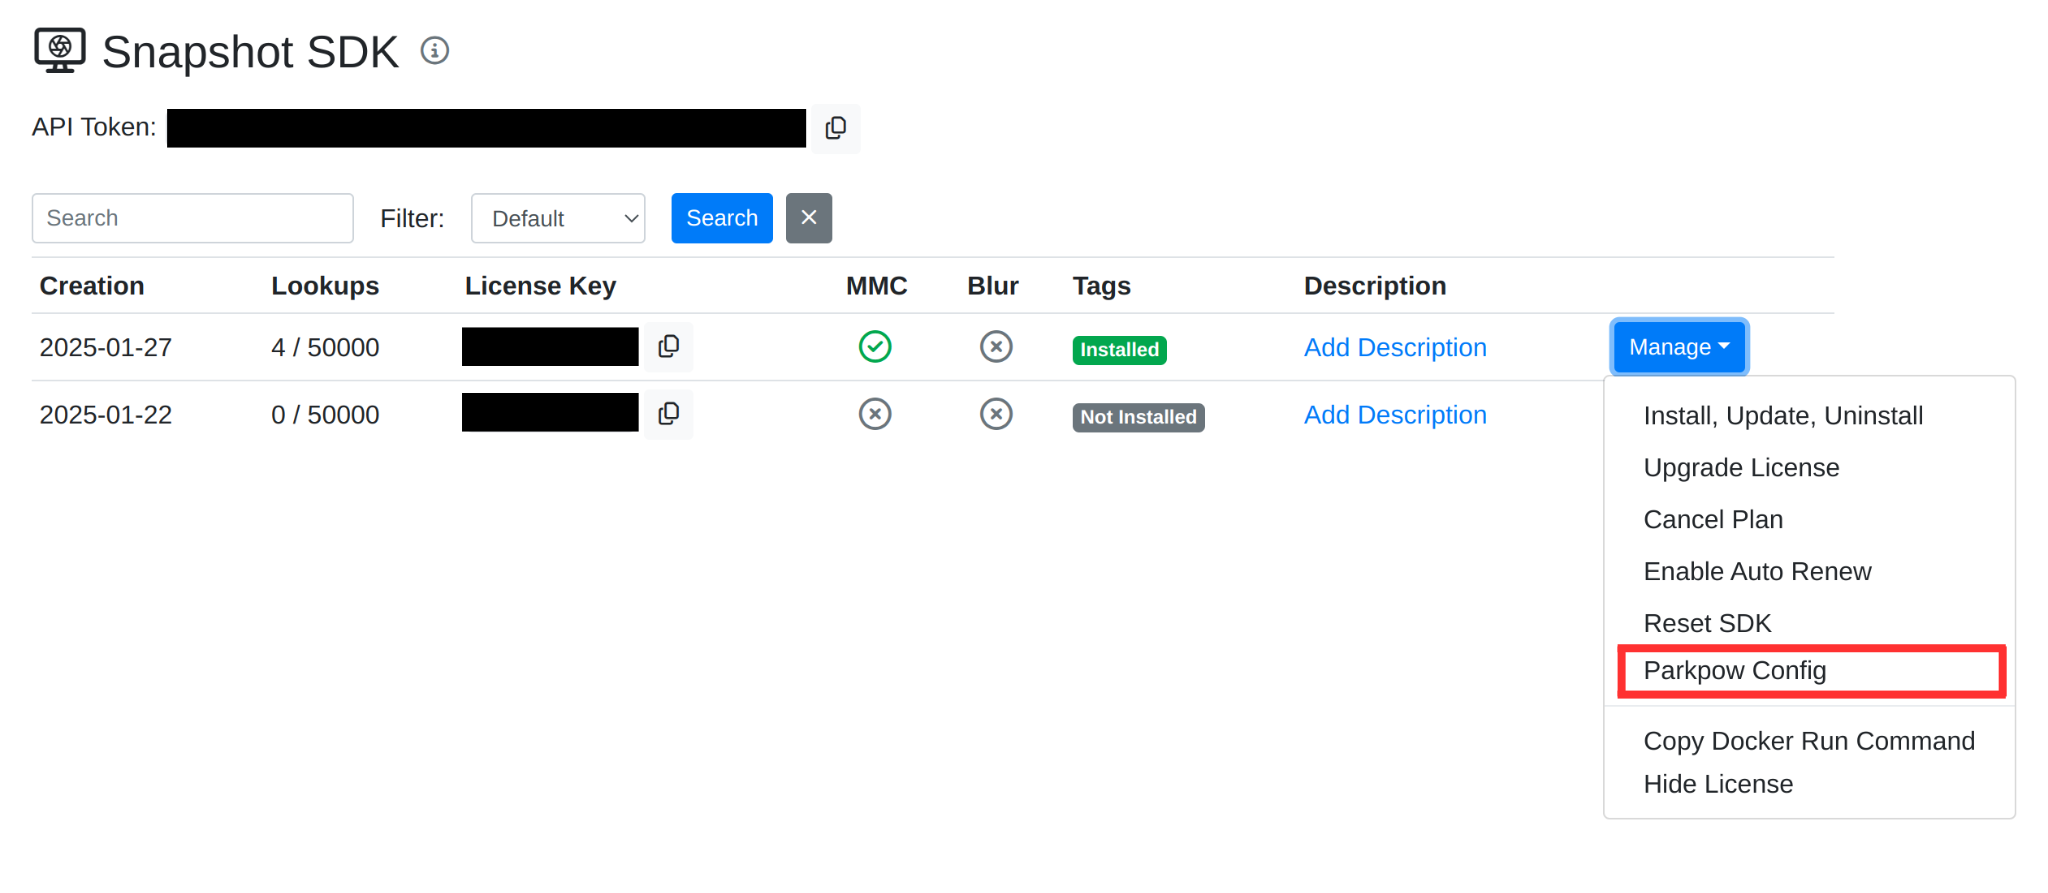
-
Once you click on ParkPow Config, the page will reload, showing a green message:
Results forwarding to ParkPow has been enabled. You can further edit your configuration in the webhook settings. Restart the Snapshot SDK container for the change to take effect.
-
Restart the Snapshot SDK container to apply the changes. Read our FAQ on how to restart a Docker container.
You can also edit the webhook on your own by following the steps in the next section, Add Webhook Manually.
Add Webhook Manually
Step 1. Login to Plate Recognizer Dashboard
Go to the Snapshot SDK Webhooks Settings page. You can also locate this in the Navbar by clicking on Apps, choose Snapshot SDK, then click on Webhooks.
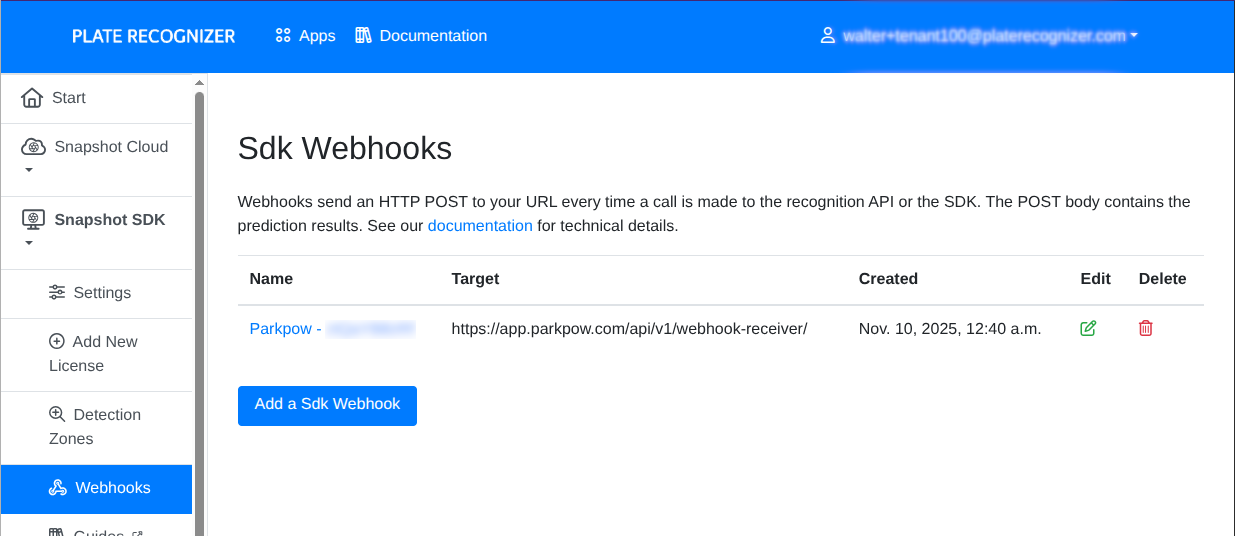
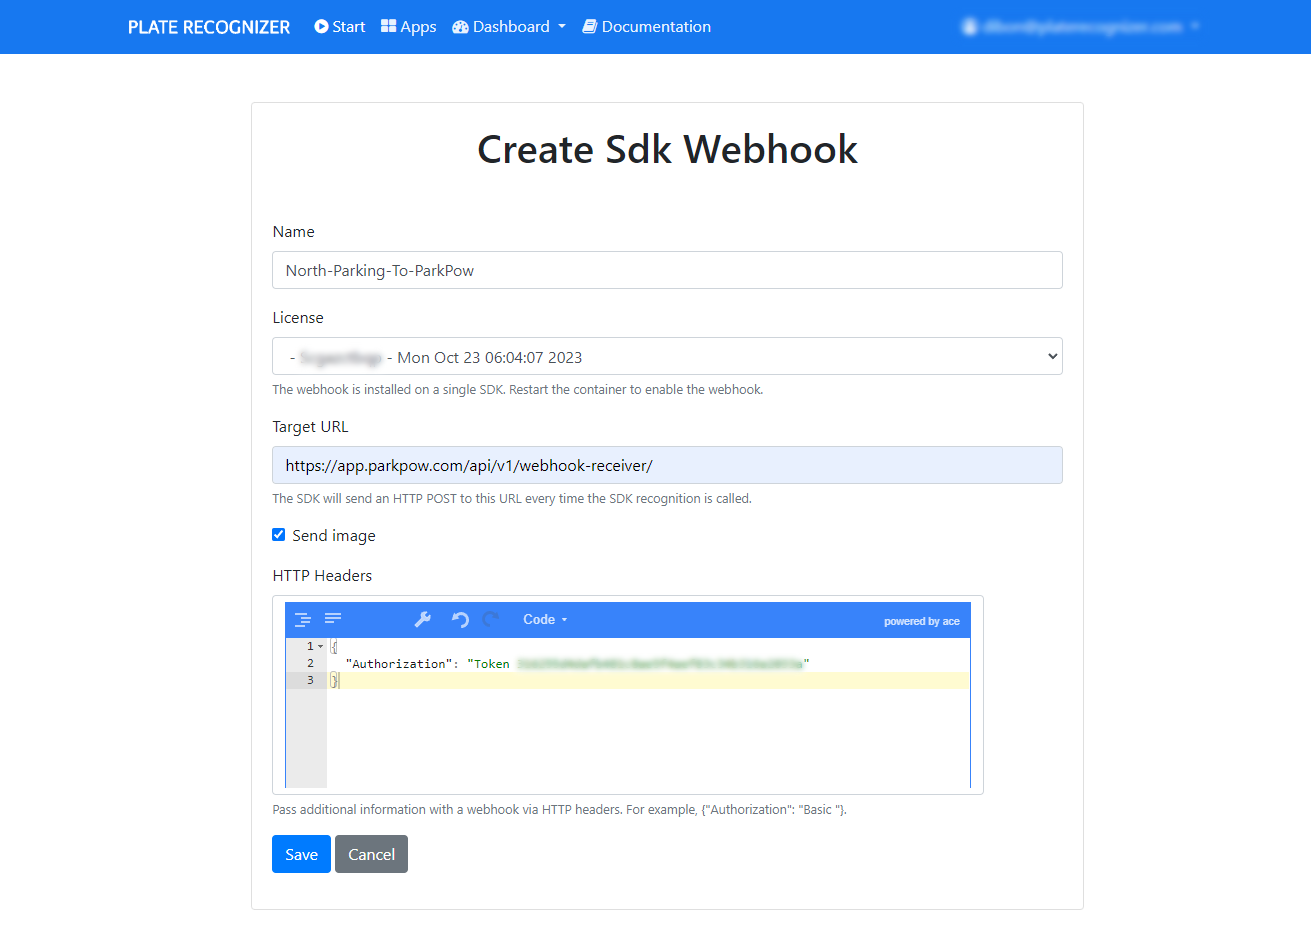
Step 2. Click on the Add a SDK Webhooks button
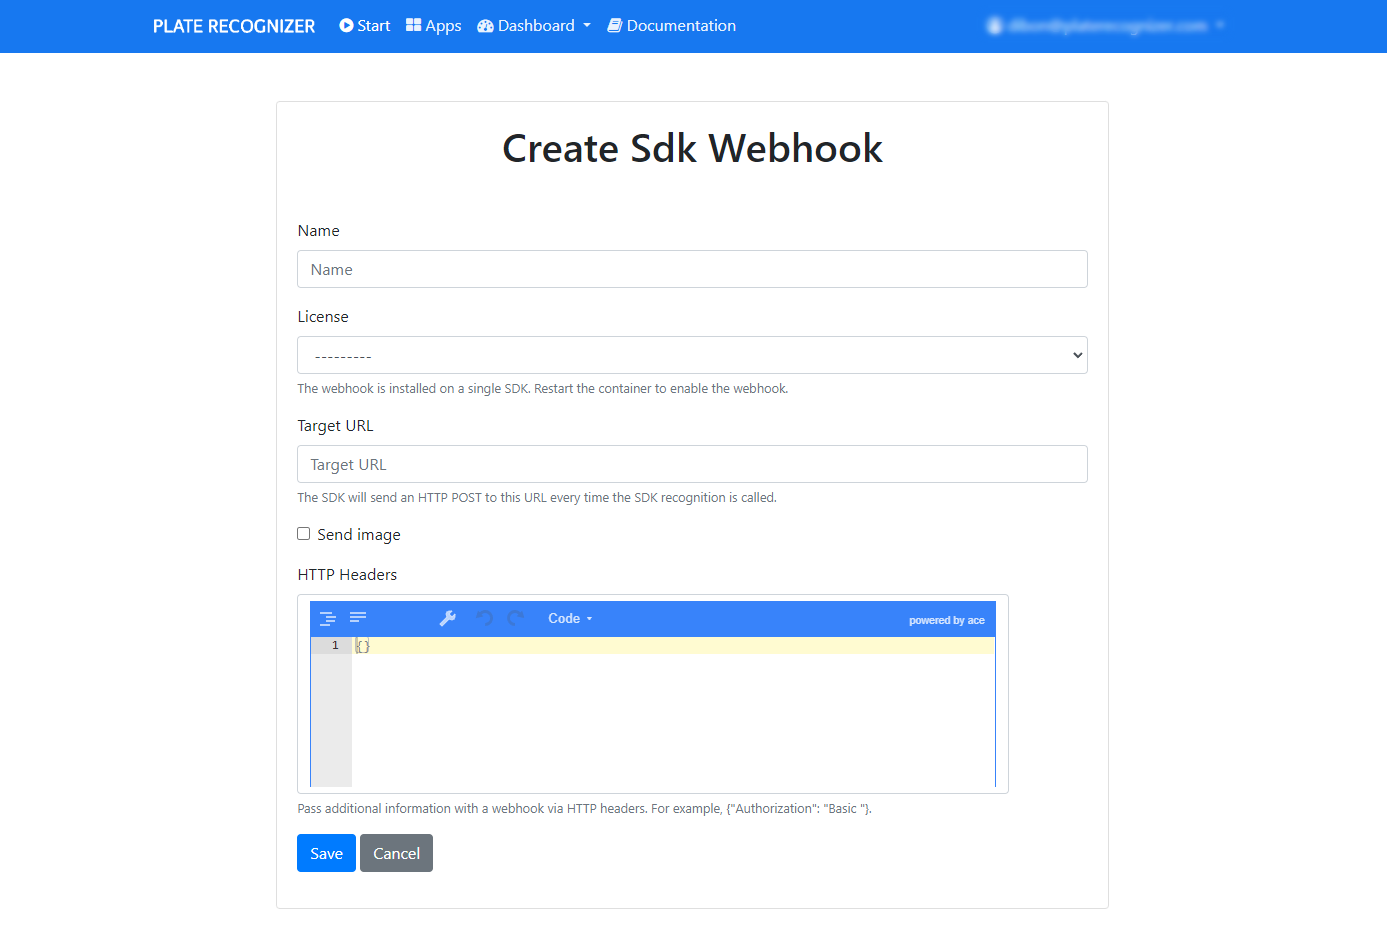
Step 3. Fill out the info
-
Use a descriptive name, such as the Parking Lot Name along with “ParkPow” so that it is clear this webhook sends info from the Parking Lot to ParkPow.
-
Select the appropriate License.
-
Enter Target URL: https://app.parkpow.com/api/v1/webhook-receiver/ For On-Premise ParkPow deployments, for Step 3 above, enter this following Target URL instead:
http://<local-ip-address>:<local-port>/api/v1/webhook-receiver/ -
Make sure to check Send Image if you need images to be forwarded to ParkPow.
-
Add the appropriate HTTP Headers to authorize requests sent to ParkPow. Copy/paste the ParkPow API Token in the Authorization Header. Get your token at app.parkpow.com/account/token/.
{
  "Authorization": "Token YOUR_PARKPOW_API_TOKEN"
}
Replace YOUR_PARKPOW_API_TOKEN with your actual token from app.parkpow.com/account/token/. Never commit this value to source control.
- Click Save. Restart the specific SDK container to apply the changes.
Step 4. (Optional) When starting the SDK, consider including the ParkPow Token in the docker command as an alternative step if Step 3.5 hasn't been done.
docker run ... -e PARKPOW_TOKEN=YOUR_PARKPOW_API_TOKEN
Stream
You can send ALPR data from Plate Recognizer Stream straight into ParkPow by configuring a webhook, by following either of the two methods below.
Requirements
- A ParkPow account. You can sign up for a free trial here.
- Stream. You can get a free trial license here. Please refer to Stream documentation for more information.
Add Webhook Automatically using the Graphical User Interface (GUI)
Step 1. Configure Stream
Login to Plate Recognizer Stream Settings. Follow these instructions to configure Stream from Plate Recognizer app.
Step 2. Click Send to ParkPow button
Click the Send to ParkPow button in the Webhooks section.
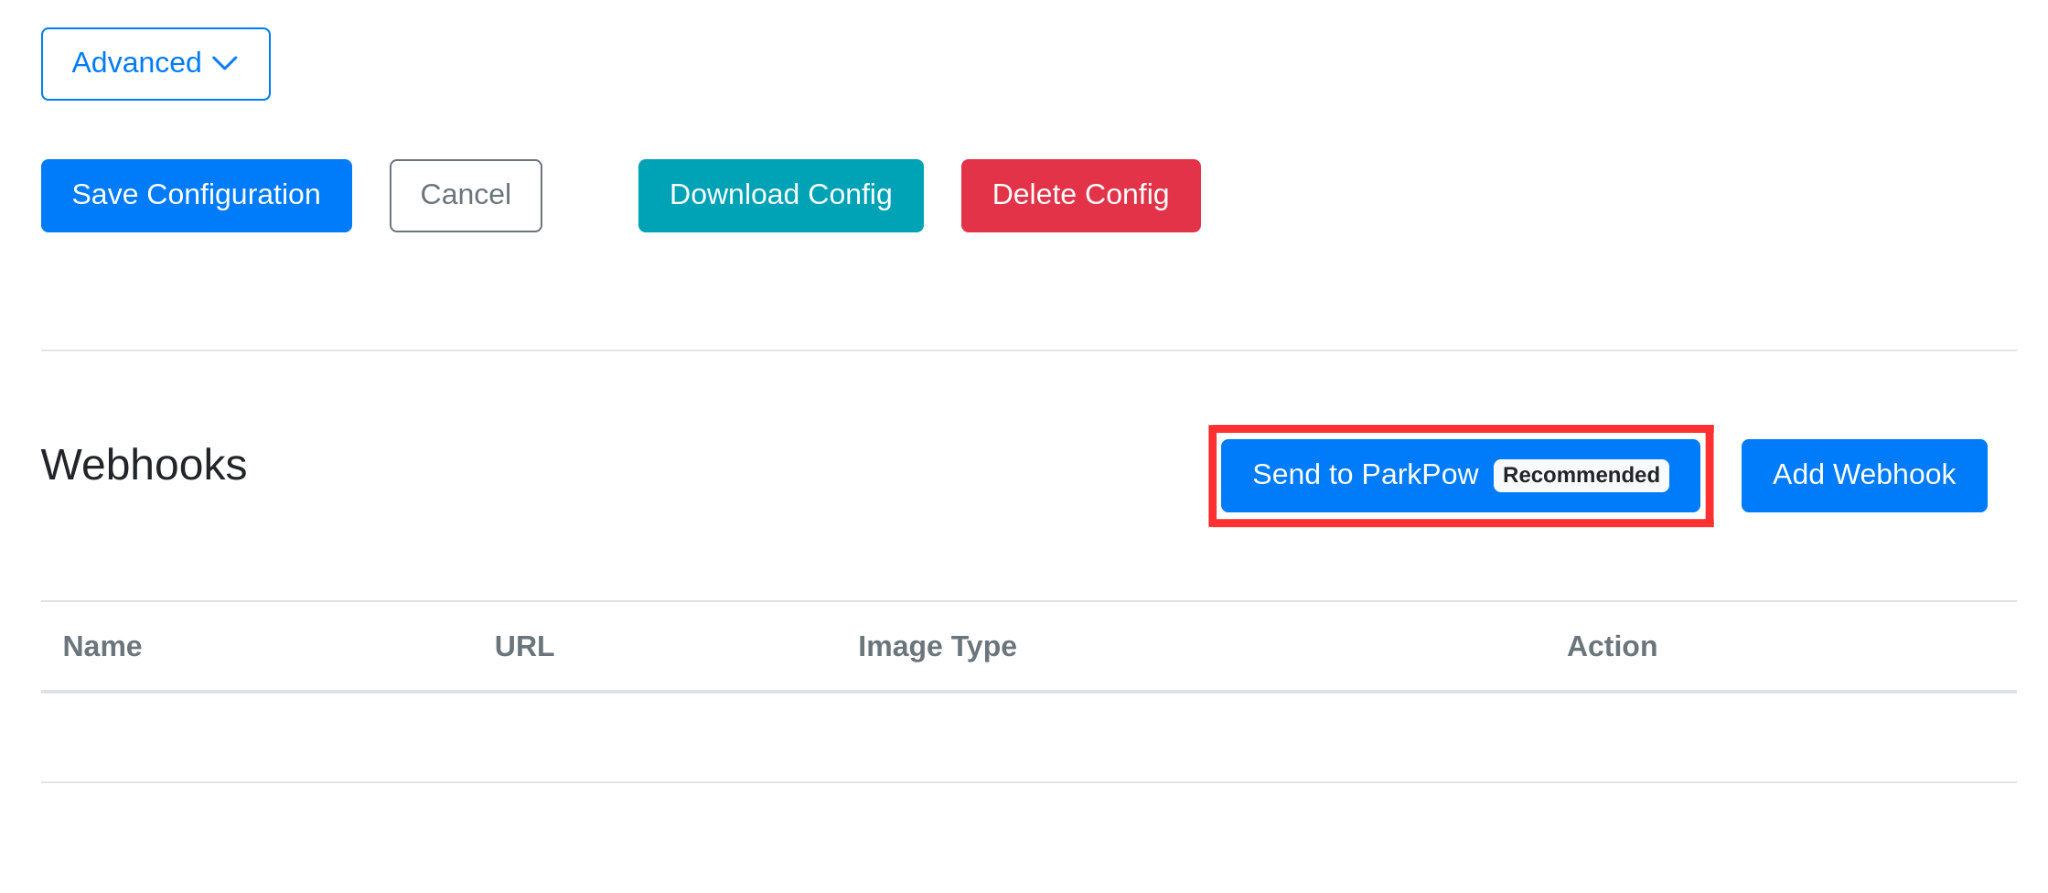
You shall see an affirmative message in the upper part:
ParkPow webhook created successfully.
A new webhook created in the Plate Recognizer app will be automatically added to the webhook targets for all cameras in the configuration. You can configure the webhook target for a specific camera by editing it in the Cameras section.
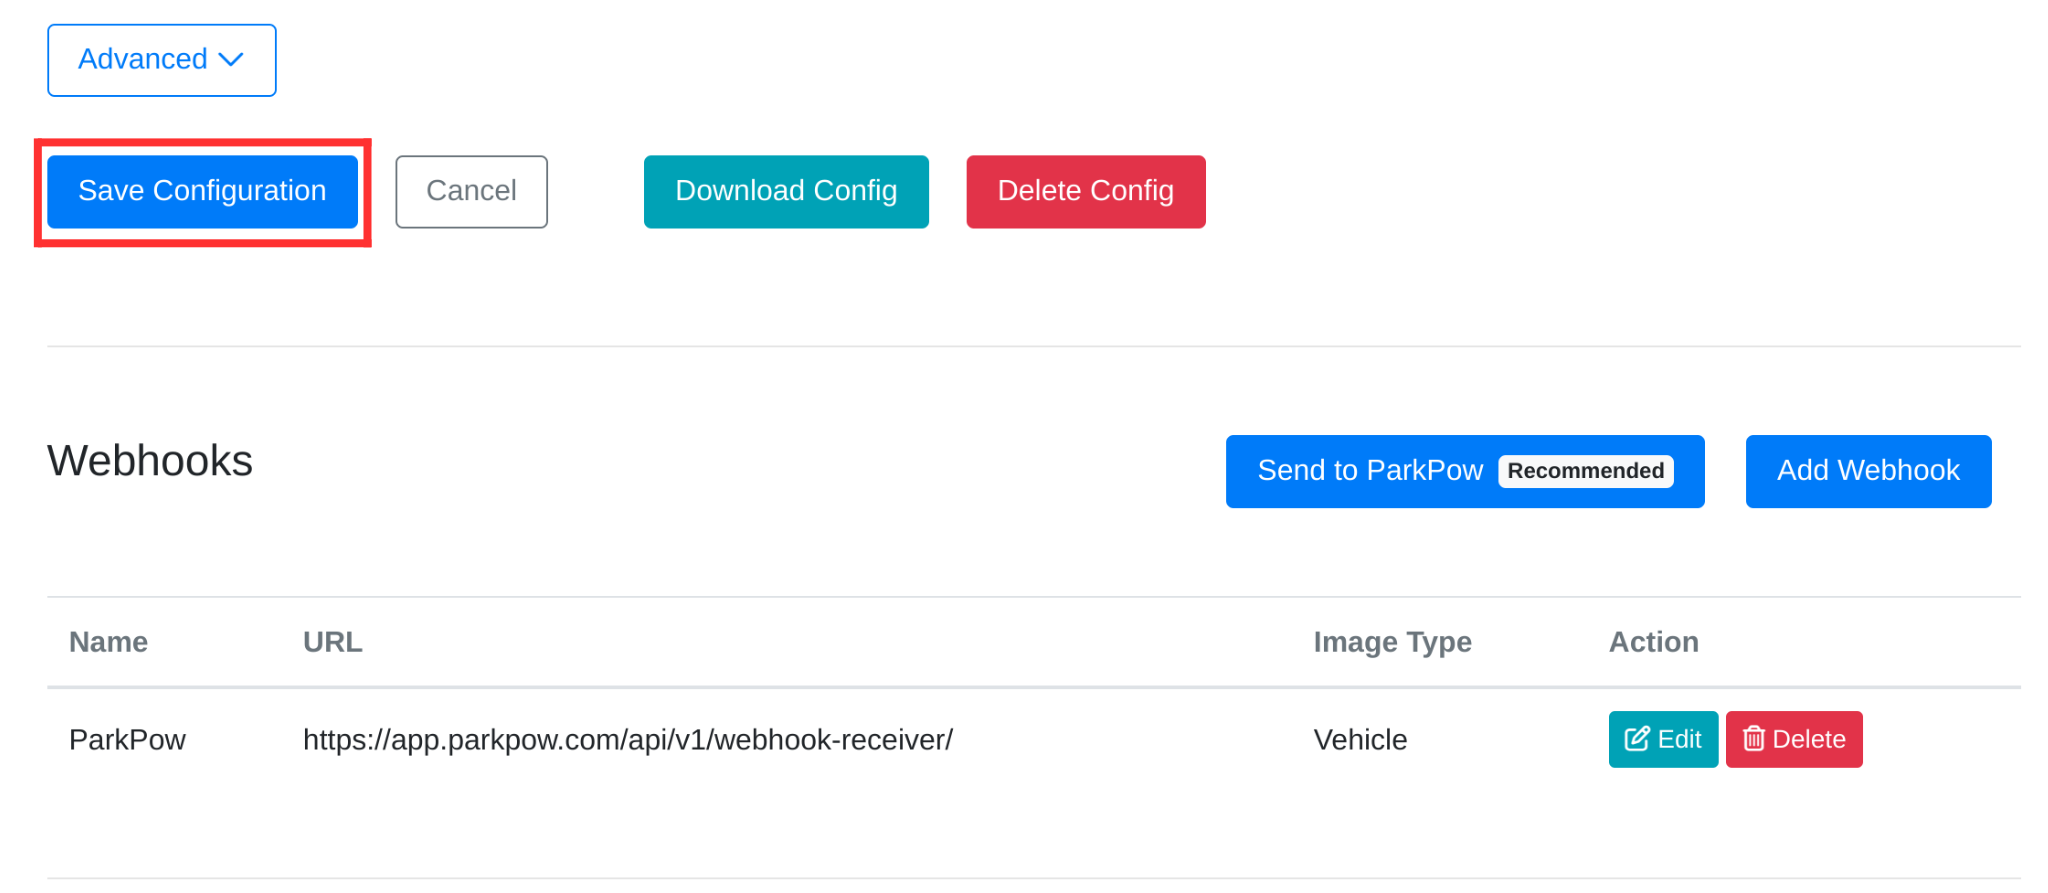
Step 3. Save and update configuration
After completing the configuration, click the Save Configuration button. Then, delete the config.ini file in the Stream (see instructions), in order to apply the changes from the GUI.
Add Webhook Manually to config.ini
Step 1. Get your API Token
Click this link to get the ParkPow API Token. You can also get to it by clicking on the profile icon in the bottom left corner and then on the API Token button.
For On-Premise ParkPow deployments, get your local ParkPow API Token: http://local-ip-address:8000/accounts/token/
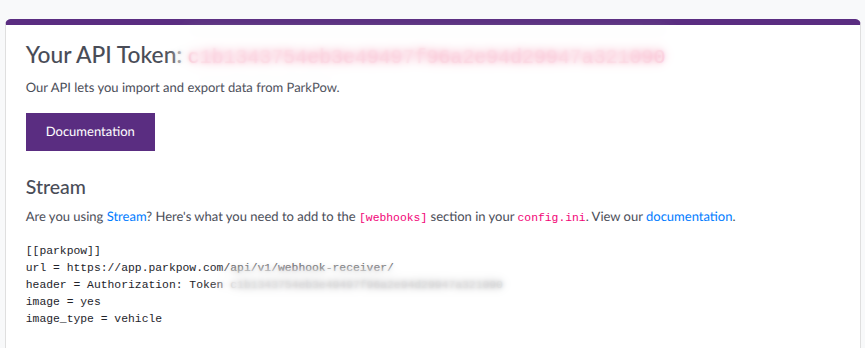
Step 2. Update Stream config.ini
Navigate to the Stream working directory, locate the config.ini file, and open it. Use the following example to configure the Webhooks section.
[cameras]
    # Global cameras parameters here
    [[camera-1]]
        active = yes
        url = rtsp://<rtsp_user>:<rtsp_password>@<rtsp_url>:<rtsp_port>/<rtsp_camera_path>
        webhook_targets = parkpow
        # More camera parameters below
        # ...

[webhooks]
    # Global webhooks parameters here
    caching = yes
    [[parkpow]]
        #ParkPow webhook receiver url where plate prediction data will be sent
        url = https://app.parkpow.com/api/v1/webhook-receiver/
        # Get your token here: https://app.parkpow.com/accounts/token/
        header = Authorization: Token YOUR_PARKPOW_API_TOKEN
        image = vehicle
        request_timeout = 20

    # More webhooks below
    # ...
Please refer to Stream Webhook Configuration for more information about webhook parameters.
For On-Premise ParkPow deployments, replace the webhook url = https://app.parkpow.com/api/v1/webhook-receiver/ with the following: http://local-ip-address:8000/api/v1/webhook-receiver/
- The camera code on ParkPow is the
[[camera-id]]from yourconfig.ini. In the example above,camera-1. If you use multiple cameras, each camera id should be different. In the ParkPow admin you can modify the display name but you should not change the camera id. - You have up to a fixed number of cameras on ParkPow, as per your license. If you have no free slots, you can edit the camera codes in the camera settings. You may also delete a camera that might not be needed. Caution: this action will delete all data associated with that camera.
- Ensure to add
webhook_targets = parkpow(parkpowbeing the webhook name, in brackets) on the individual camera configuration to tell Stream to send plate prediction data from that camera to the specified webhook target. More Stream webhook config information here
Step 3. Restart Stream container
To apply this change you will need to restart the Stream Docker container using the following command:
docker restart stream
To confirm that the changes have taken effect, you can check the Stream container logs:
docker logs stream
Optionally you can use the flag -f to follow the log entries in real-time:
docker logs -f stream
Congrats! You can go to the ParkPow app to set up your environment, such as your sites, cameras, time zone, etc.
FTP
You can send image uploads from your device directly to our FTP server, where the system will do license plate recognition.
Requirements
-
A ParkPow account. You can sign up for a free trial here.
-
Snapshot Cloud. You can get a license here. It's already included when you sign up for a free trial. Please refer to Snapshot Cloud documentation for more information.
-
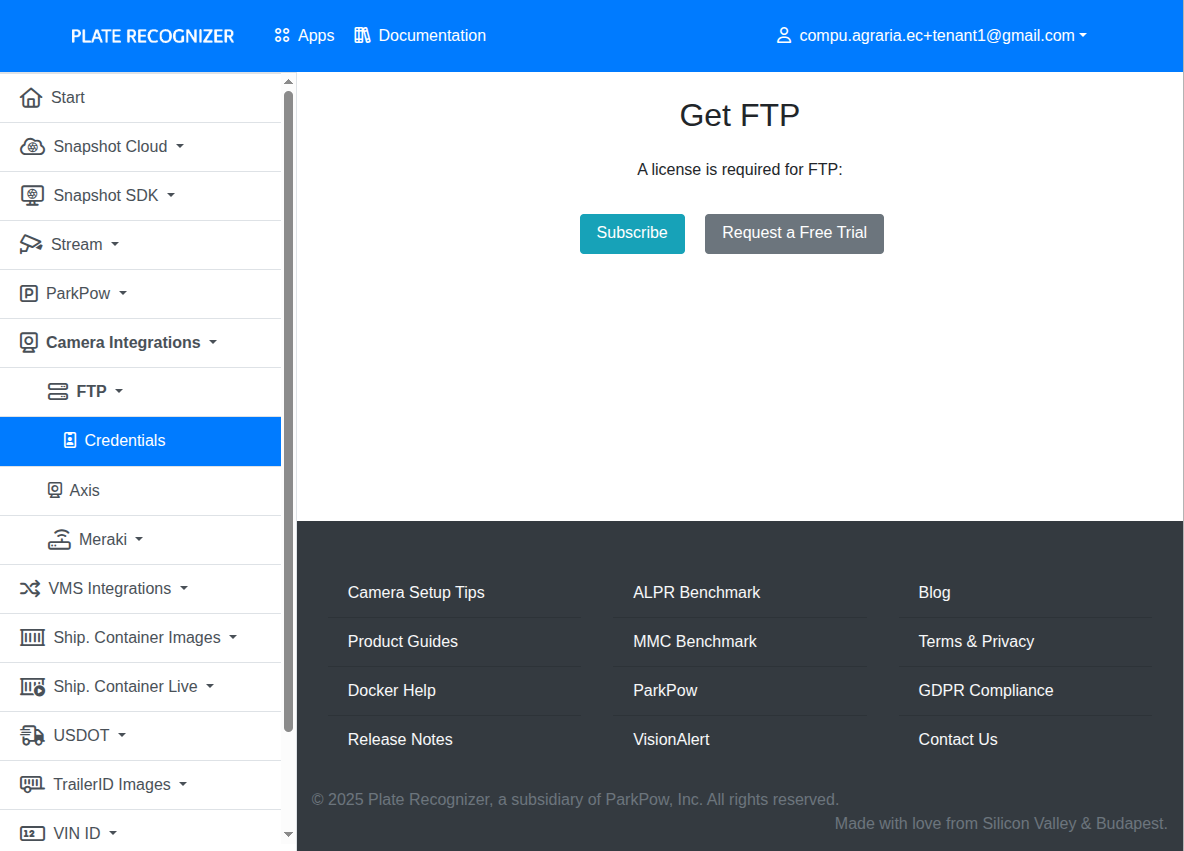
FTP credentials. The credentials to use the system can be requested by clicking Camera Integration > FTP > Credentials, or according to the image below.
-
FTP-compatible IP camera.
Configure FTP
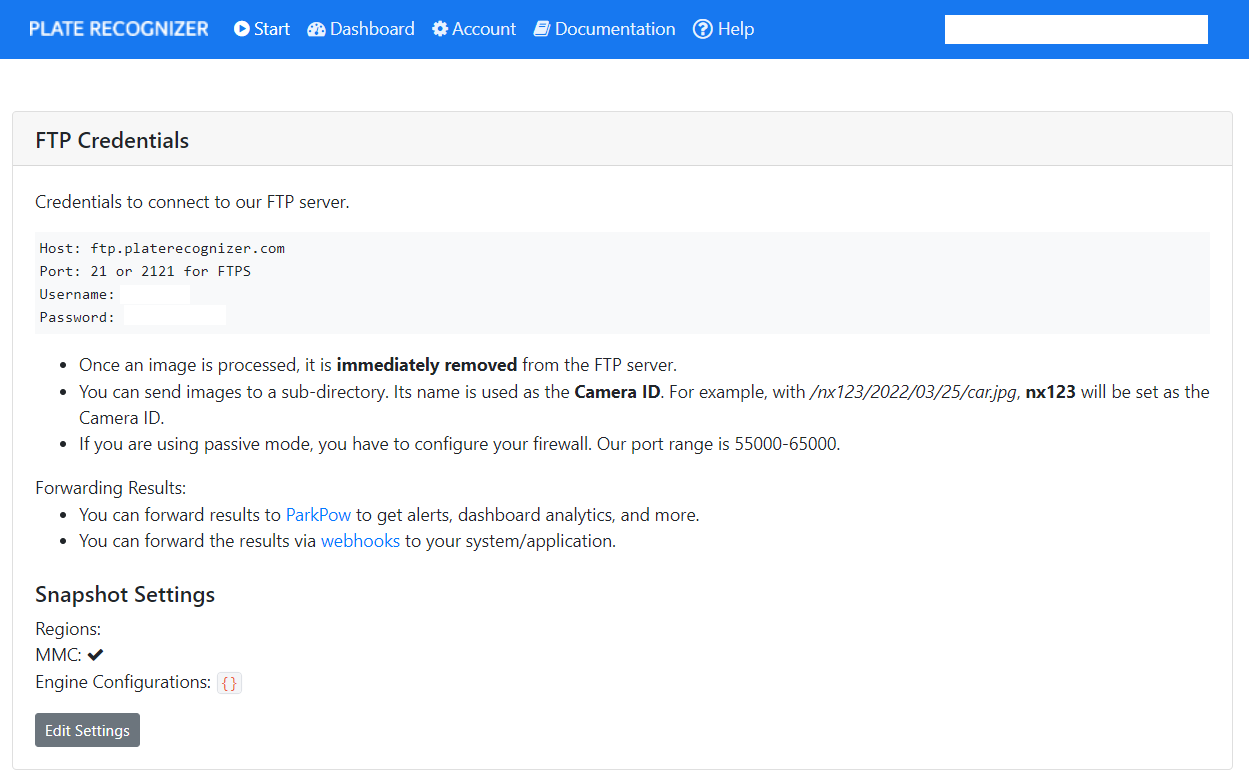
Step 1. Get your FTP credentials
Once you get granted access to your FTP credentials, you can view them in the FTP Credentials page.
Step 2. FTP configuration on your device
Most devices allow FTP configuration for sending captures. You can check the configuration method of main devices compatible with our platform here.
- Once an image is processed, it is immediately removed from the FTP server.
- You can send images to a sub-directory. Its name is used as the Camera ID. For example, with
/nx123/2022/03/25/car.jpg,nx123will be set as the Camera ID. - If you are using passive mode, you have to configure your firewall. Our port range is 55000-65000.
Please keep in mind that, just as with the API, there is an images/second rate limit for FTP uploads, per license. If you exceed these limits, uploads may be ignored, rejected, and your FTP accounts could be temporarily suspended. You can check your current rate limits in the Snapshot Cloud Settings page.
Step 3. Set up Snapshot Cloud to forward data to ParkPow
Information retrieved from FTP can be viewed in the Plate Recognizer's Dashboard menu.
Please refer to above sections about Snapshot Cloud integration with ParkPow. The Plate Recognizer FTP service allows recognitions to be exported to ParkPow, and/or to a Webhook of your choice. For more information, please refer to Snapshot Cloud documentation.
REKOR Scout
You can migrate ALPR data from REKOR Scout into ParkPow.
This will create new cameras using the code rekor-<rekor-camera-id> from your existing cameras in REKOR Scout. Make sure you have enough available cameras, as you can't combine the ones you already have with those from REKOR Scout.
Migrate Data
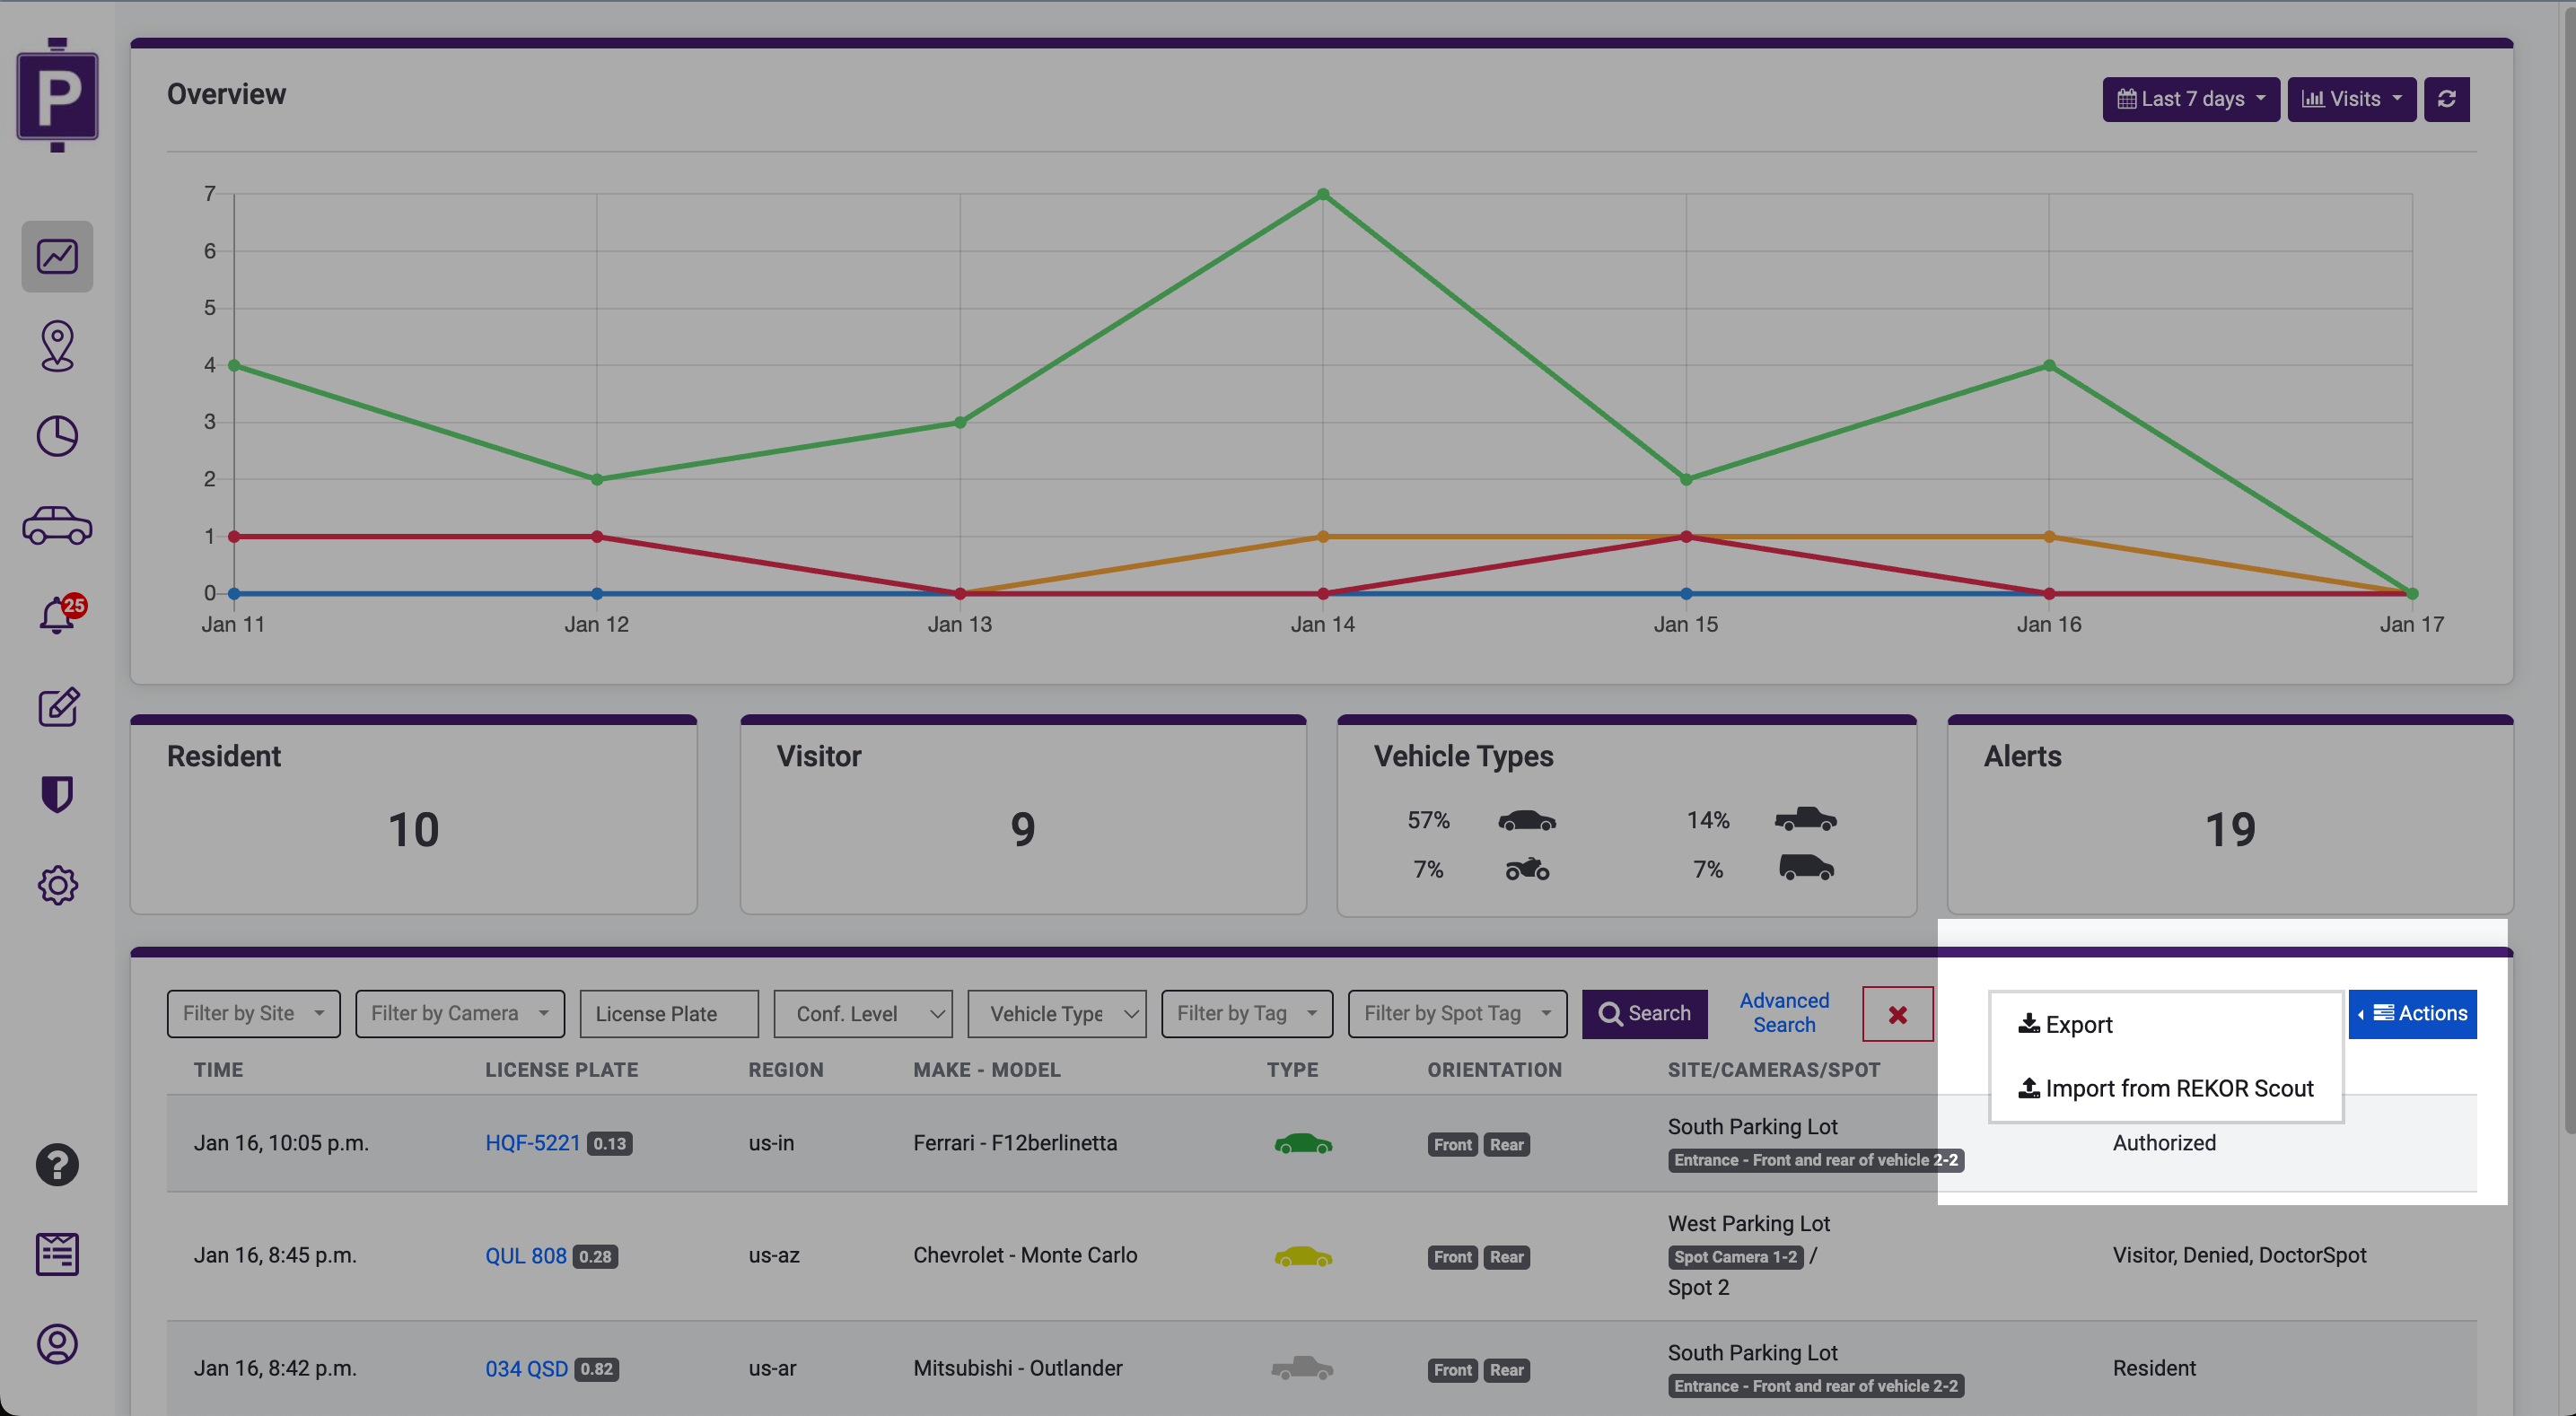
This step will send the existing data from REKOR Scout to ParkPow.
After signing in to ParkPow, click on the action button on the dashboard, then select Import from REKOR Scout.
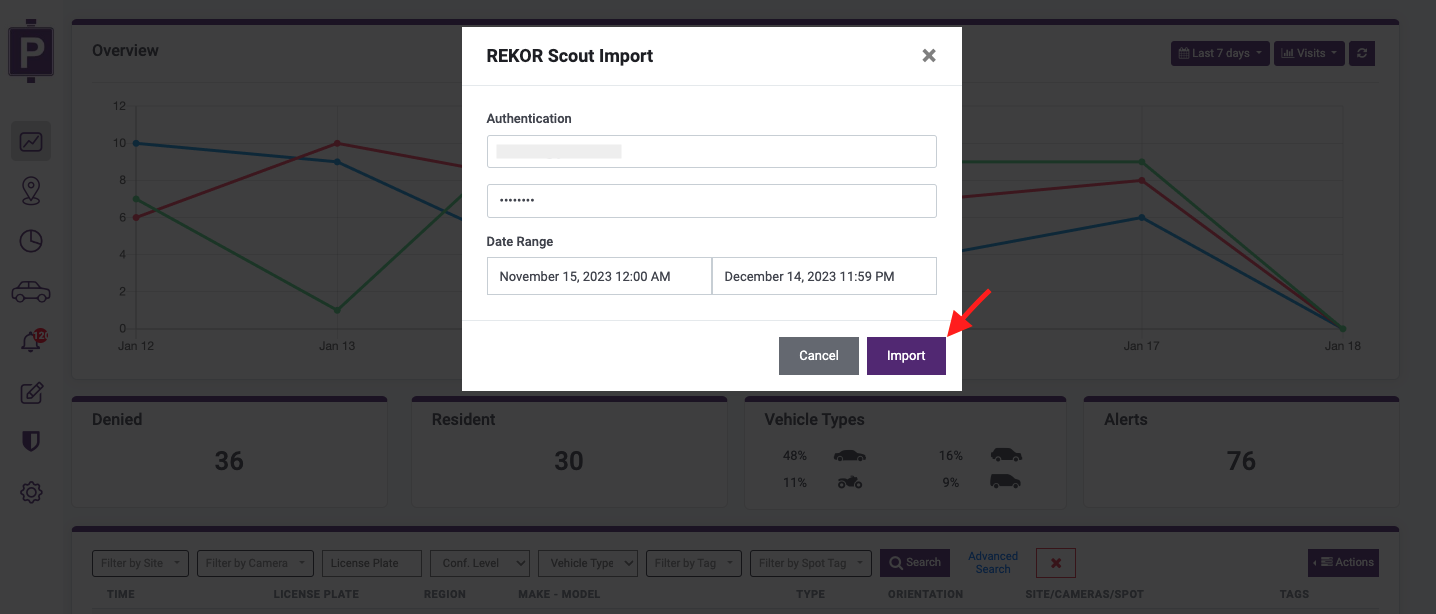
Fill the authentication section form with your REKOR Scout's credentials, and select the Date Range for the data you wish to import. Then, click Import.
Webhook Configuration
Follow these steps to feed future data from REKOR Scout to ParkPow.
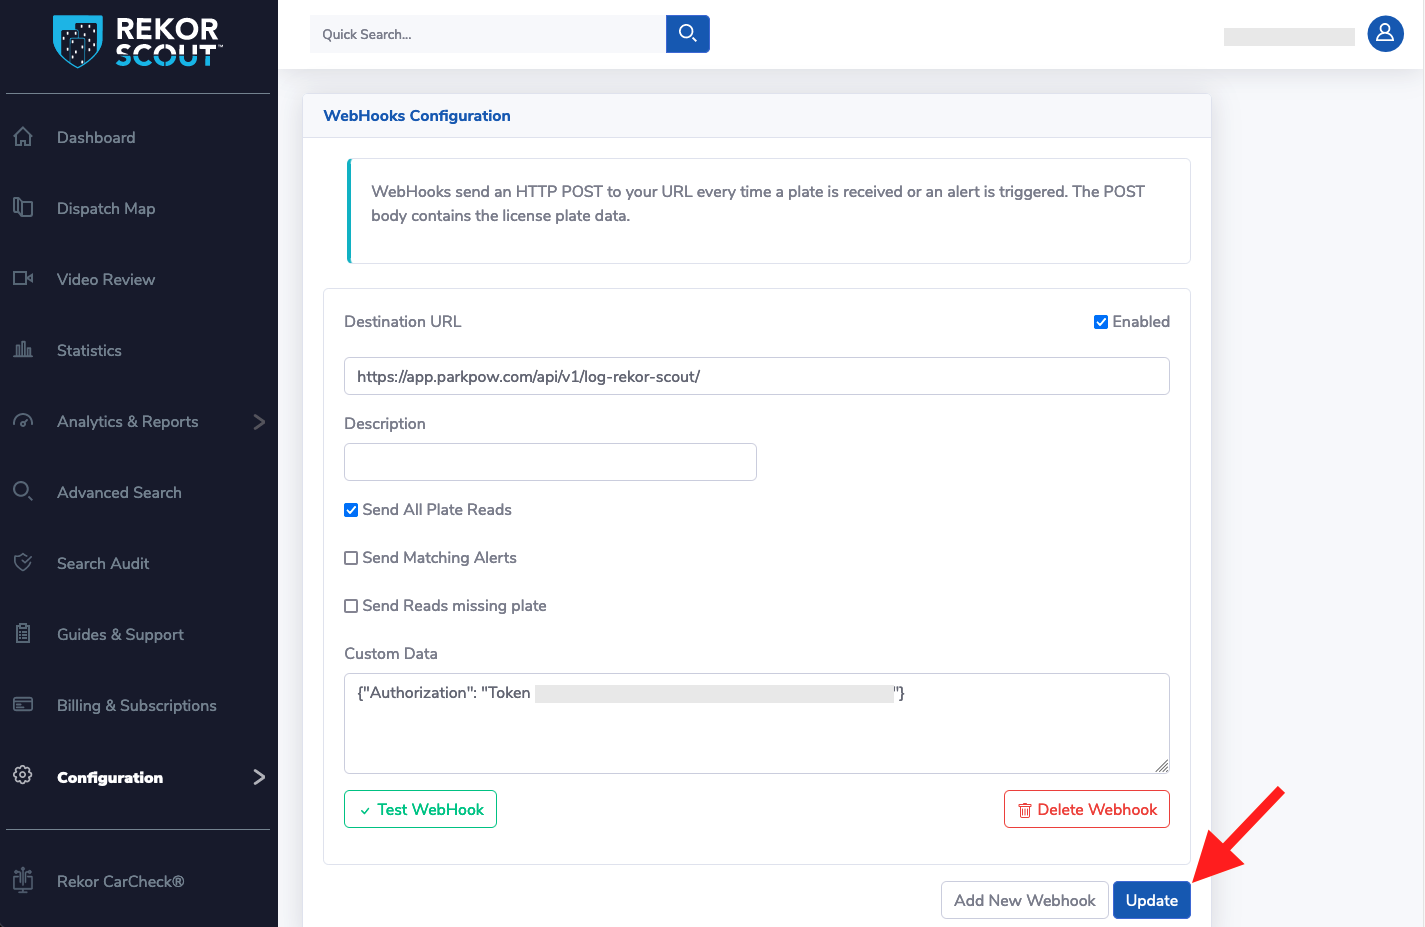
Sign in to REKOR Scout and go to Webhook Configuration.
Click on Add New Webhook.
Fill in the Destination URL field with the following URL:
https://app.parkpow.com/api/v1/log-rekor-scout/
For On-Premise ParkPow deployments, use the following URL:
http://parkpow-onprem-ip-address:8000/api/v1/log-rekor-scout/
Check the Send All Plate Reads option and add {"Authorization": "Token YOUR_PARKPOW_API_TOKEN"} to the Custom Data field. Get your ParkPow API Token at app.parkpow.com/account/token/.
Replace YOUR_PARKPOW_API_TOKEN with your actual token. Never commit this value to source control.
Click on Update.
UTMC
You can send ALPR data to ParkPow from cameras that support the UTMC (Urban Traffic Management and Control) protocol, such as Motorola's Avigilon and Hanwha Vision security cameras. These ALPR cameras send plate read data to a central system via SOAP/XML.
The camera acts as the client: on every plate read, it sends a payload to an HTTP endpoint configured directly on the camera. To enable this, three settings must be configured on the camera side: endpoint, camera identification, and authentication.
Requirements
- A ParkPow account and its API Token. You can get your ParkPow API Token at app.parkpow.com/account/token/.
- A camera that supports the UTMC protocol.
Configure the Camera
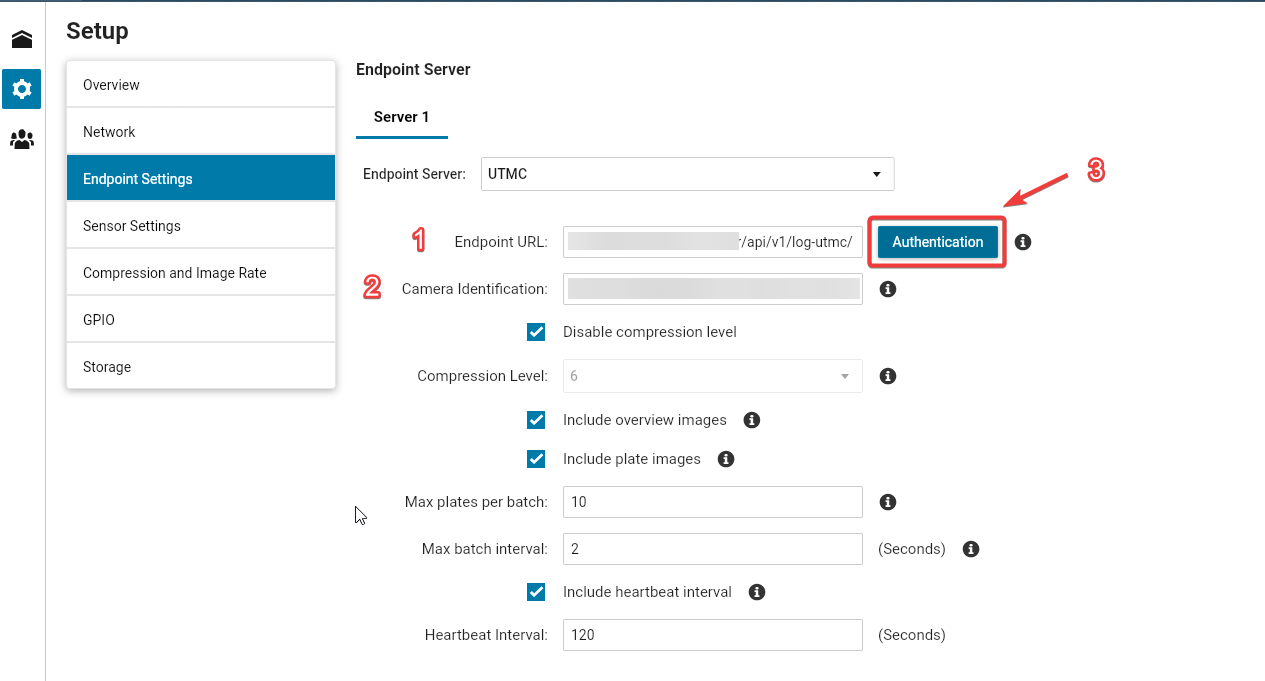
Step 1. Set the Endpoint
In the camera's configuration screen, select UTMC as the protocol option, then locate the Endpoint field (also called "Server URL" or "Installation Address") and set it to:
https://app.parkpow.com/api/v1/log-utmc/
For On-premises ParkPow deployments, use the following URL instead:
http://parkpow-onprem-ip-address:8000/api/v1/log-utmc/
(see item 1 in the image above)
Step 2. Set the Camera Identification
In the Camera ID field (also called "Camera Identification"), set a unique identifier for the camera, e.g., Camera-Entrance-01.
This value is used as the camera name in ParkPow. If a camera with this ID doesn't exist yet, it will be created automatically on the first read sent.
(see item 2 in the image above)
Step 3. Set up Authentication
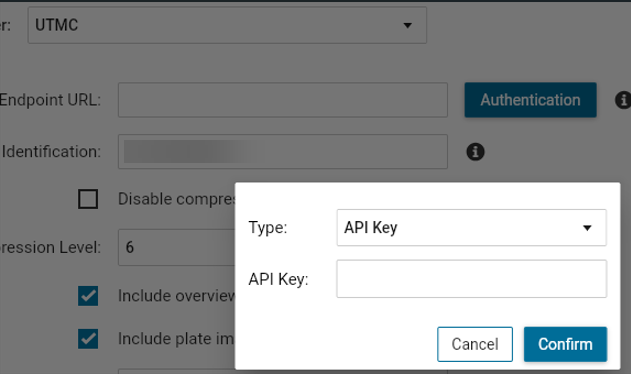
In item 3 of the image above, select the authentication option (usually available through an Authentication button). This may vary depending on your camera's configuration screen; the example below shows API-Key authentication, but the integration also supports the following header formats:
Authorization: Token YOUR_API_TOKENAPI-Key: YOUR_API_TOKENX-API-Key: YOUR_API_TOKEN
Select the authentication method supported by your camera, then paste your ParkPow API Token in the token field. Get your token at app.parkpow.com/account/token/.
Never commit your ParkPow API Token to source control.
Once you configure and save the three settings above, the camera is ready to send plate reads to ParkPow.
If the camera captures vehicle attributes such as Make, Model, Color, and Direction, the integration supports them, and they will be included along with the plate read sent to ParkPow.
After saving, confirm that plate reads appear in your ParkPow account. If no data arrives, check:
- The endpoint URL is correct and reachable from the camera’s network.
- The API Token is valid and matches the one in your ParkPow account (verify at [app.parkpow.com/account/token/]((app.parkpow.com/redacted)
- The Camera ID field is not empty.
Stream CSV Upload
You can upload the Stream CSV file-type results from Stream folder to ParkPow by using Bulk Operation Tools for ParkPow guide.