Stream Cloud
Stream Cloud allows you to process a video stream in the cloud with minimal hardware setup. This is only feasible for clients in the USA, Canada and Europe.
License Requirements
Share the following keys and tokens from Platerecognizer
Connectivity and Bandwidth Requirements
Ensure your internet connection is stable and the bandwidth does not go below the total bit rate of your video Stream
Use this tool to figure out the bit rate of your Stream: https://github.com/unleashlive/stream-bitrate-stats/tree/master Use this site to do a speed test: https://fast.com/
The bit rate can vary depending on several factors, including the encoding settings, resolution, frame rate, and desired video quality. The recommended video resolution is 1280x720 pixels (720p) or 1920x1080 pixels (1080p) Recommended encoding is H.264 or H.265 Recommended frame rate is based on the desired eFPS that is calculated from the default Stream sample rate of 2:
- For vehicles traveling <30 mph → set the FPS to 10.
- For vehicles traveling 30-60 mph → set FPS to 20.
- For vehicles traveling >60 mph → set FPS to 24.
Approximate bandwidth requirements for different resolutions:
| Name | Resolution | Bandwidth |
|---|---|---|
| Standard Definition (SD) | 480p | 1-2 Mbps |
| High Definition (HD) | 720p | 2-4 Mbps |
| Full HD (FHD) | 1080p | 4-8 Mbps |
| Ultra HD (UHD) or 4k | 2160p | 10-20 Mbps |
These bandwidth recommendations assume a relatively efficient video compression algorithm such as H.264 or H.265.
If possible disable audio streaming to reduce bitrate and hence low bandwidth usage. Available bandwidth might be affected by internet activity from other devices connected to the same network.
Typical Installation
To use Stream Cloud, you need to provide direct access to the camera stream. This allows the Stream to process the stream and deliver the results. Besides providing the URL of our servers for external access, the camera's URL must be accessible from outside your local network. Therefore, some measures may be necessary to make the URL externally accessible.
Below, we present some common setups to achieve this. However, there are various ways to accomplish this goal.
It is highly recommended to provide a URL protected with a login and password to ensure security.
Setup Options
Reverse SSH
Contrary to how SSH works, where you establish a secure connection with a remote system and can receive and send data, in reverse SSH, the remote system connects with your local system or other devices and ports you allow in your local network.
Requirements
Hardware on the local network such as a Raspberry Pi to initiate a reverse SSH connection
Setup Guide
-
Setup the hardware to initiate a reverse ssh connection on the same network as the cameras.
-
Install
autosshon the hardware for automatic reconnection in case of a broken connection.sudo apt-get install autossh -
Share your SSH public key usually located at
~/.ssh/id_rsa.pub. If you don't have one, generate using the commandssh-keygen -
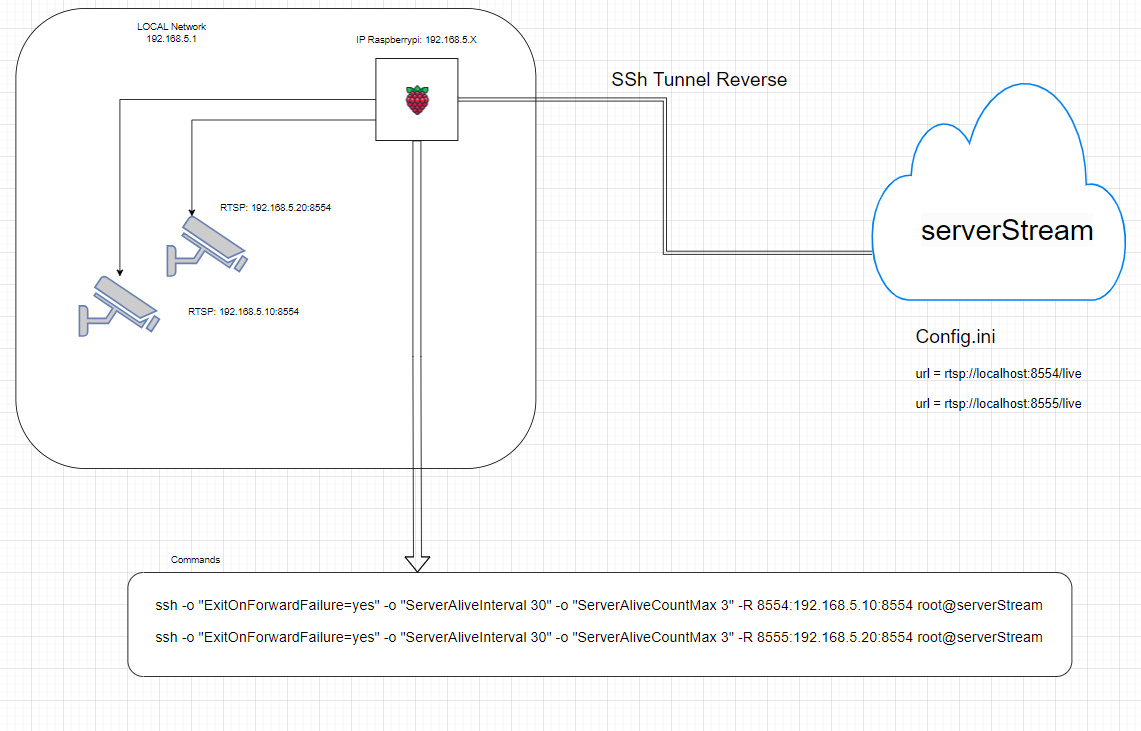
Setup the reverse ssh tunnel for a camera using provided credentials and port from Platerecognizer. Example tunnel for 1 camera located at 192.168.5.20:8554 with an approved port of 4000 on Platerecognizer side:
In this example, port 4000 is configurable and could be different which is set on Platerecognizer side to listen for mapped cameras from the reverse ssh connection.
autossh -N \
    -T \
    -R 4000:192.168.5.20:8554 \
    -o "ExitOnForwardFailure yes" \
    -o "ServerAliveInterval 30" \
    -o "ServerAliveCountMax 3" \
    -i /home/sshkeyuser/.ssh/id_rsa reverse-tunnel@stream-cloud-ip
To automatically start the tunnel on boot, create a systemd service
[Unit]
Description=AutoSSH tunnel for Stream Cloud
After=network.target
[Service]
Environment="AUTOSSH_GATETIME=0"
ExecStart=/usr/bin/autossh -N -T -R 4000:192.168.5.20:8554 -o "ExitOnForwardFailure yes" -o "ServerAliveInterval 30" -o "ServerAliveCountMax 3" -i /home/danleyb2/.ssh/id_rsa reverse-tunnel@stream-cloud-ip
User=sshkeyuser
[Install]
WantedBy=multi-user.target
Enable and start the service
sudo systemctl enable autossh-tunnel.service
sudo systemctl start autossh-tunnel.service
To check for startup errors
sudo systemctl status autossh-tunnel.service
-
Share the configured tunnels and local RTSP URL for configuration on Platerecognizer side. Check the network diagram below for reference
Port Forwarding
Forwarding a port is a way to allow a connection from the internet, through your router, to a device on your network. You can think of forwarding a port as putting the device on the outside of your router. Your router blocks all incoming connection requests making it impossible for some services to work correctly. A port forward overcomes this limitation. In order to forward ports, you will need to know the ports that the application uses and the IP address of the device that you are forwarding ports to.
Requirements
- Publicly routable IP address. Check below for more information.
- A router that supports port forwarding, If you have more than 1 router, it should be the router directly connected to the internet.
- If you have multiple cameras, ensure the camera RTSP port is configurable(changeable) and the router allows port forwarding to more than 1 IP and port.
- The camera RTSP setup should allow configuring authentication for security.
Setup Guide
- Visit admin interface of the router and setup port forwarding.
- Replace forwarded port in original camera RTSP url and share including authentication info.
- Confirm that the URL is working correctly by testing in a media player such as VLC.
Site-to-Site IPSec VPN
Site-to-site VPN connectivity between Stream Cloud and your network, The supported protocol is IPSec using IKEv1 or IKEv2. This allows connectivity to multiple cameras on your network without having to configure each individually.
Requirements
- A publicly routable IP address
- Network Appliance that supports Site-to-site IPSec VPN such as Meraki MX.
- VPN software with firewall features to restrict access to other devices on your network
Setup Guide
Platerecognizer will provide configurations specific to you after you provide the following details:
- Your public IP
- CIDR block for the VLAN containing the camera
Sample Configurations
Generic Video Box
Some manufacturers provide adapters that allow external connections to devices on an internal network. These can connect to your surveillance system and offer a URL for direct access to the video stream.
If you have a device that centralizes cameras (DVR, NVR, Cloud Box), check with the manufacturer that you can access the camera's transmission URL (RTSP) to provide to our team.
This adapter facilitates the connection by transforming your surveillance system into a cloud-based solution, automatically managing the connection without the need to configure the router or DDNS, or to have a public IP address.
Publicly routable IP address
Your public IP should be accessible and can be communicated with over the global internet You can find your public IP address by checking your router or doing a Google search of What’s my IP
How Check if your IP is publicly routable
- Contact ISP(Internet Service Provider): Check with your ISP to confirm if your IP address is routable over the internet, they might have to switch you to a different data plan.
- Ping a DMZ device on your network:
- Confirm that public IP does not send out ICMP packets by pinging your public from a remote computer or online tool such as https://ping.eu/ping/
- In your router settings, Configure a device on your network that is able to send out ICMP packets(PING) as the DMZ
- Try pinging your public IP again and check if you get back responses
- Access a service(web server) on your network:
- Start a web server on a device on your local network
- Configure port forwarding to the device and server port on your router
- Try accessing your server from a different internet connection such as cellular
If your IP address is public but Dynamic(changes every time the router connects), check if you can find a static one from your ISP or set up DDNS so that you have a hostname that is always mapped to your IP address.
Set up Dynamic DNS(DDNS)
- Choose a DDNS service provider: There are several DDNS service providers available, such as No-IP, DynDNS, and DuckDNS. Select a provider and sign up for an account. Some providers offer free plans with limited features, while others have paid plans with additional benefits.
- Configure your router: Access your router's settings by typing your router's IP address into a web browser. The IP address is typically mentioned in the router's manual or labeled on the device itself. Look for a section called "Dynamic DNS" or something similar.
- Enable DDNS on your router: Within the router settings, find the DDNS configuration options. Enter the account details provided by your DDNS service provider, including the hostname, username, and password. Select the DDNS provider you signed up with from the list provided.
- Verify DDNS functionality: Save the changes made to the router settings and allow it to restart if necessary. The router should now update the DDNS service provider with your public IP address whenever it changes. To confirm that it's working correctly, check the DDNS service provider's website or use a tool to verify that your DDNS hostname resolves to your current IP address.
- Test remote access: If you have set up port forwarding, test whether you can access your services remotely using the DDNS hostname. For example, if you have a camera, try accessing it using the DDNS hostname (e.g. http://hostname.com ).
